


Tried to draw a butterfly?....so many times….but there is always “something” that does not let you finish the drawing as you would like to?
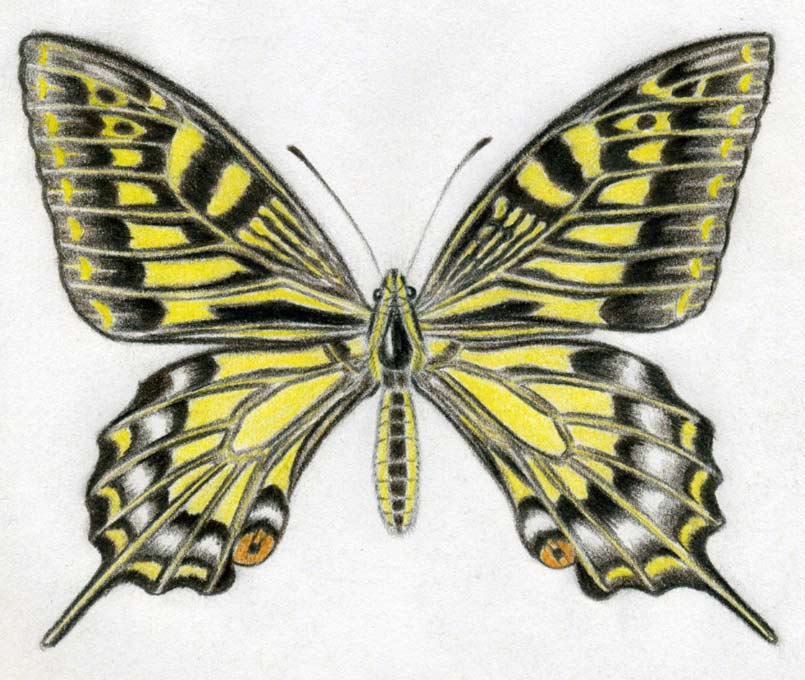
One of the misleading things that manipulate us on drawing a butterfly is its wing pattern.
Yes, that natural design is often “too beautiful” to our eyes.
It is even so attractive that it totally gets your attention.
It gets our attention to such degree that all we see is that incredible pattern and forgetting about the rest.
You may suddenly feel or say to yourself: “…well, this is un-drawable…or…I just cannot draw this!…)

Once you decide to draw a butterfly, wouldn’t you just love to draw the most beautiful one? Despite its “seeming” difficulty?!
Here is a useful tip for overcoming initial setback when you draw a butterfly:
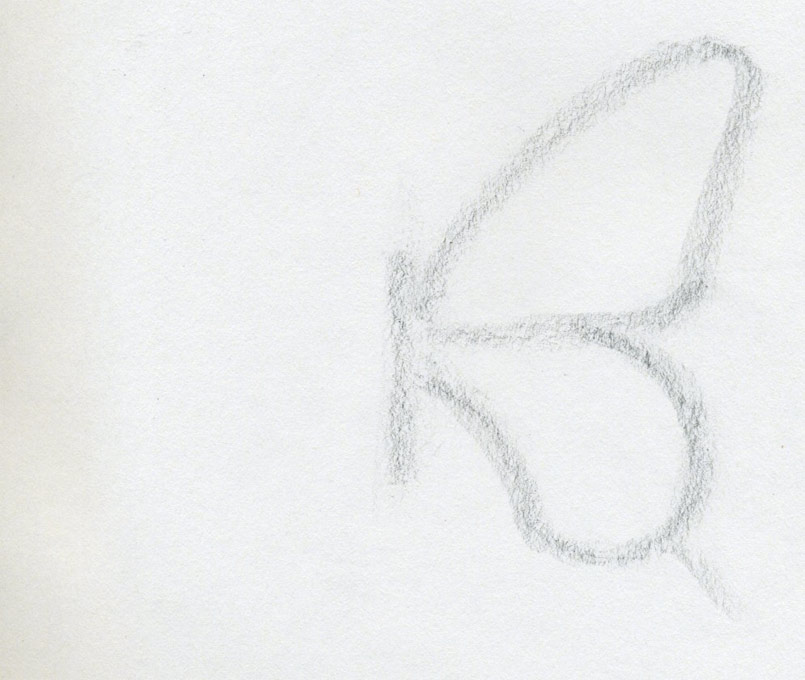
Draw (study) both (front and hind) wings separately first. Observe the shape of front wings and decide (pick) which one you’ll practice. Right or left?
Then draw one selected wing – purposely enlarged. This exercise will help you to acquire more skill in capturing the pattern (design) on the wing and the shape of wing itself.
Generally, if any part of a butterfly may seem too difficult, practice drawing that part separately and possibly enlarged.

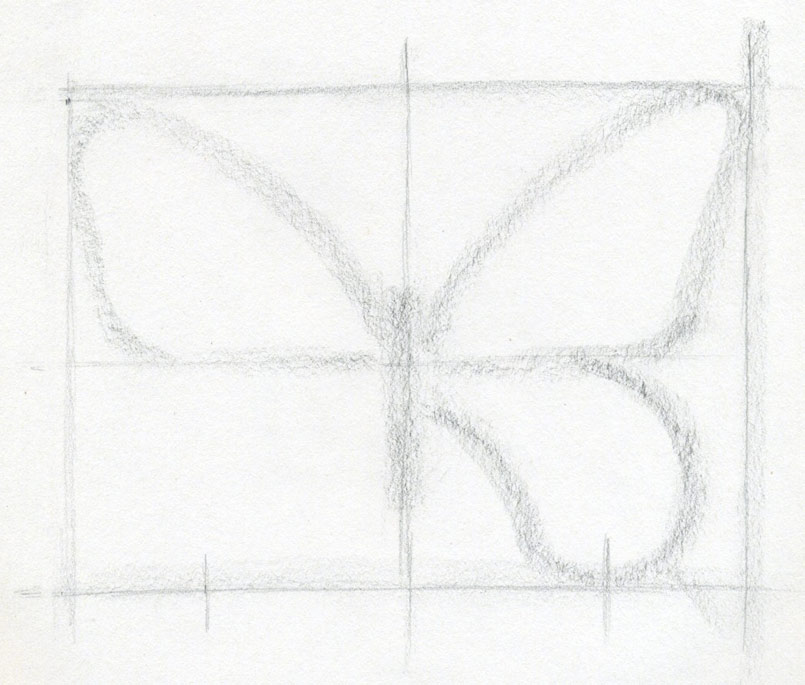
Do not draw it too big (e.g. a whole A4 size paper) because you may find yourself entrapped in details. Size of cca: 140mm x 120mm would be just OK.
Hold your pencil tilted and draw the body. Next draw front and hind wings on one side.
This sequence is not “the only sequence”, so you can always adjust the process as it feel best for you.

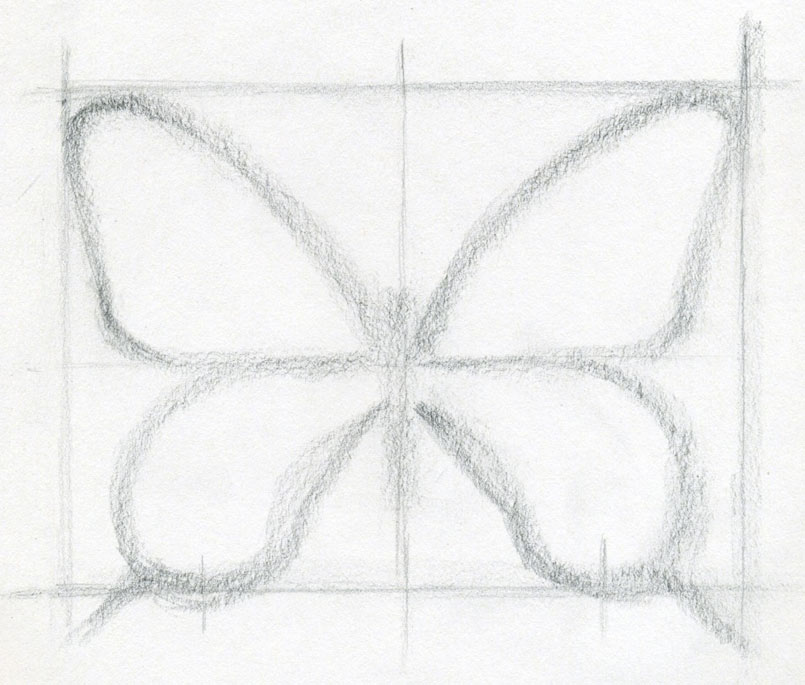
Draw the grid in free hand. No ruler!
If your lines are not very straight, erase them and draw the gridlines again. You do not need to make them perfect as a ruler.
My lines aren’t straight either. But who cares? It’s only a drawing.

Notice here, that the wings are only the rough contours. The outlines.

Gradually erase the initial pencil sketches of wing outlines and draw clearer contours.
Enlarge the picture and see how I did it. I actually made a couple of weak pencil guidelines in order to keep the balance on both sides.
The tricky part when you draw a butterfly is the toothed contour on hind wings. It is very easy to draw only one side but may be difficult to match exactly the opposite side the same way.
Good idea is also to draw first only one side (either right or left) and then fold the paper half in the middle of the body and imprint the graphite on the other side, so that you can get exactly both sides the same.
I described this process here in butterfly drawings.


Draw gentle and weak lines. Make special attention here on curves. Even the slightest ones, because these curves are important here.

I picked this design on purpose because if you learn this one, than you will be able to draw virtually any design you choose.

You can continue to fill it up with colored pencils or simply draw it only by graphite pencil.

Notice that I am leaving very thin lines blank among the patterns. These are the veins and they should be visible.
Make sure your pencil is sharpened well so that you will be able to draw thin lines.

If you are not sure about which colors to mix, make tests on a separate paper. Make as many tests as necessary. It is a usual technique and commonly used among artists.
If you decided to draw a butterfly like this and spend your time with it, and I suppose you would like to make it as nice as possible then by all means make these color tests on separate paper.
It is only necessary in the beginning. Once you know which color pencils to mix then no more test are necessary.
While coloring, I would advice you to color (fill in) both front wings first. While coloring you are going more visual and your work suddenly starts to emerge from a previously obscure sketch.
The symmetry on the wings will be even more visible now, so it is good to draw the front wigs first and hind wings second.

Do not sweat too much about colors if you draw with color pencils because you can never get it quite right. Consider the colors rather as symbols.

Notice however that there are such cloudy whiter spots on hind wings. These aren’t present on front wings.
One of the misleading things that manipulate us on drawing a butterfly is its wing pattern.
Yes, that natural design is often “too beautiful” to our eyes.
It is even so attractive that it totally gets your attention.
It gets our attention to such degree that all we see is that incredible pattern and forgetting about the rest.
You may suddenly feel or say to yourself: “…well, this is un-drawable…or…I just cannot draw this!…)
click the image to enlarge
I tried to make every step as clear as possible and I hope you will get the right idea while practicing.Once you decide to draw a butterfly, wouldn’t you just love to draw the most beautiful one? Despite its “seeming” difficulty?!
Here is a useful tip for overcoming initial setback when you draw a butterfly:
Draw (study) both (front and hind) wings separately first. Observe the shape of front wings and decide (pick) which one you’ll practice. Right or left?
Then draw one selected wing – purposely enlarged. This exercise will help you to acquire more skill in capturing the pattern (design) on the wing and the shape of wing itself.
Generally, if any part of a butterfly may seem too difficult, practice drawing that part separately and possibly enlarged.
click the image to enlarge
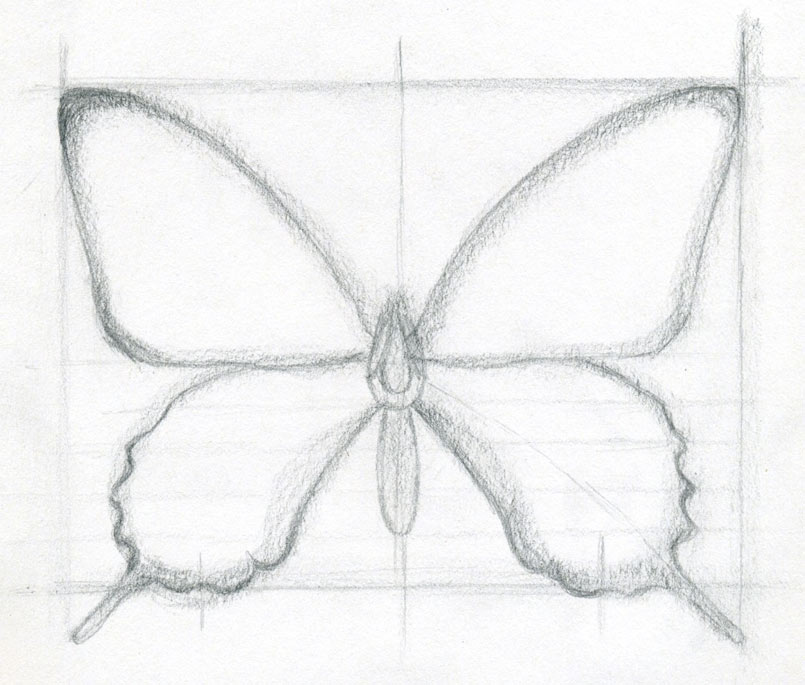
Before you begin to draw a butterfly, decide the size. Do not draw it too big (e.g. a whole A4 size paper) because you may find yourself entrapped in details. Size of cca: 140mm x 120mm would be just OK.
Hold your pencil tilted and draw the body. Next draw front and hind wings on one side.
This sequence is not “the only sequence”, so you can always adjust the process as it feel best for you.
click the image to enlarge
In order to capture both sides of the wings as accurate as possible sketch a simple grid.Draw the grid in free hand. No ruler!
If your lines are not very straight, erase them and draw the gridlines again. You do not need to make them perfect as a ruler.
My lines aren’t straight either. But who cares? It’s only a drawing.
click the image to enlarge
When you have the grid draw the rest of wings on both sides. Notice here, that the wings are only the rough contours. The outlines.
click the image to enlarge
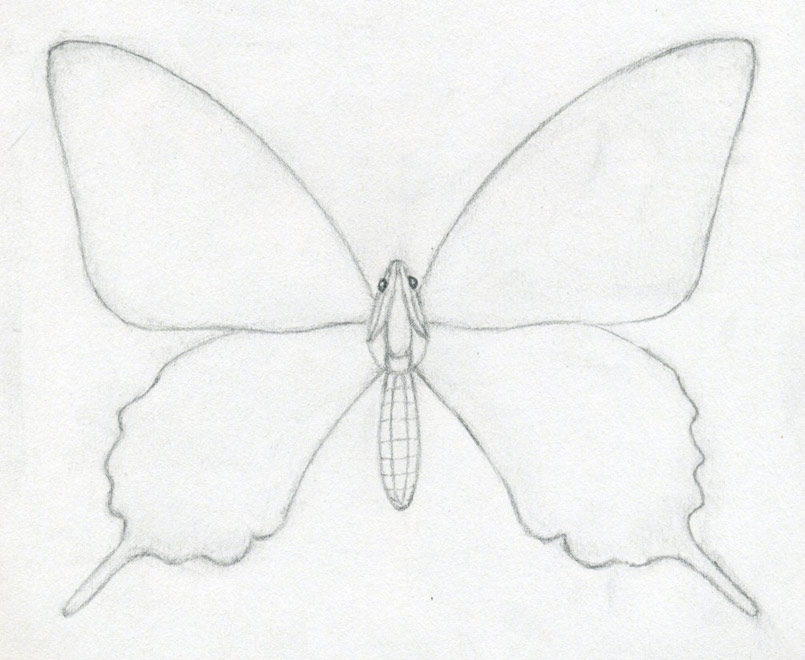
It is time to clarify the final shape - the final contour of wings. Observe the size, the symmetry among front and hind wings.Gradually erase the initial pencil sketches of wing outlines and draw clearer contours.
Enlarge the picture and see how I did it. I actually made a couple of weak pencil guidelines in order to keep the balance on both sides.
The tricky part when you draw a butterfly is the toothed contour on hind wings. It is very easy to draw only one side but may be difficult to match exactly the opposite side the same way.
Good idea is also to draw first only one side (either right or left) and then fold the paper half in the middle of the body and imprint the graphite on the other side, so that you can get exactly both sides the same.
I described this process here in butterfly drawings.
click the image to enlarge
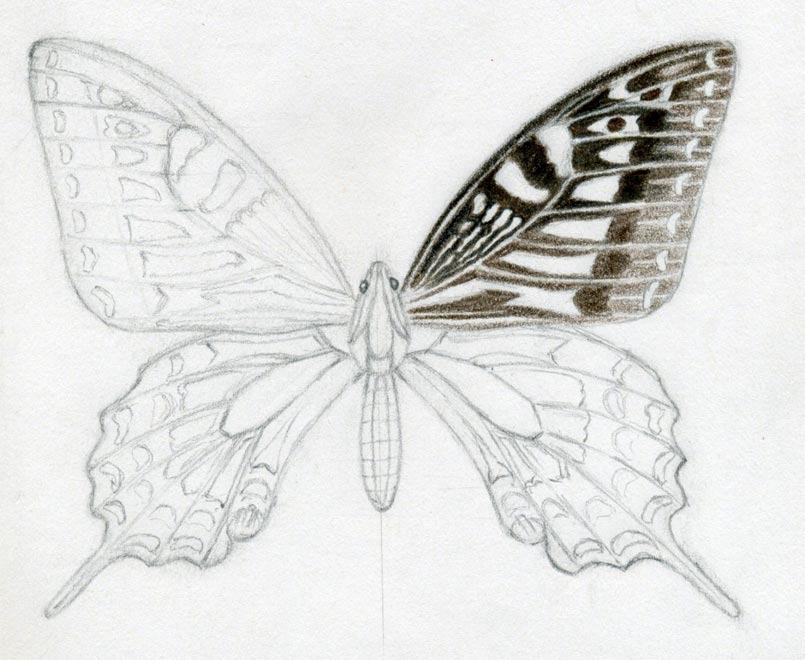
Erase the rest of pencil lines so that only one clear outline contour of all four wings will remain. Plus the body of a butterfly.
click the image to enlarge
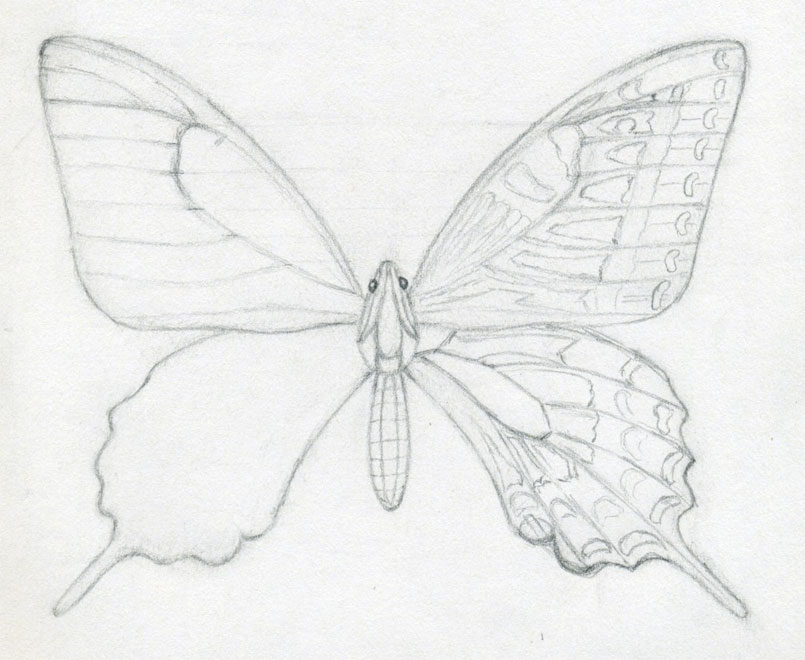
Begin to draw the basic sketches of wing pattern. Be easy about it. Draw gentle and weak lines. Make special attention here on curves. Even the slightest ones, because these curves are important here.
click the image to enlarge
ontinue drawing the wing design. Take your time. Remember you are drawing a quite complex design pattern so be patient. The reward will be sweet.
If you draw a butterfly that has a simple wing design, you can have it done in less than 5 minutes. This one may take a little more.I picked this design on purpose because if you learn this one, than you will be able to draw virtually any design you choose.
click the image to enlarge
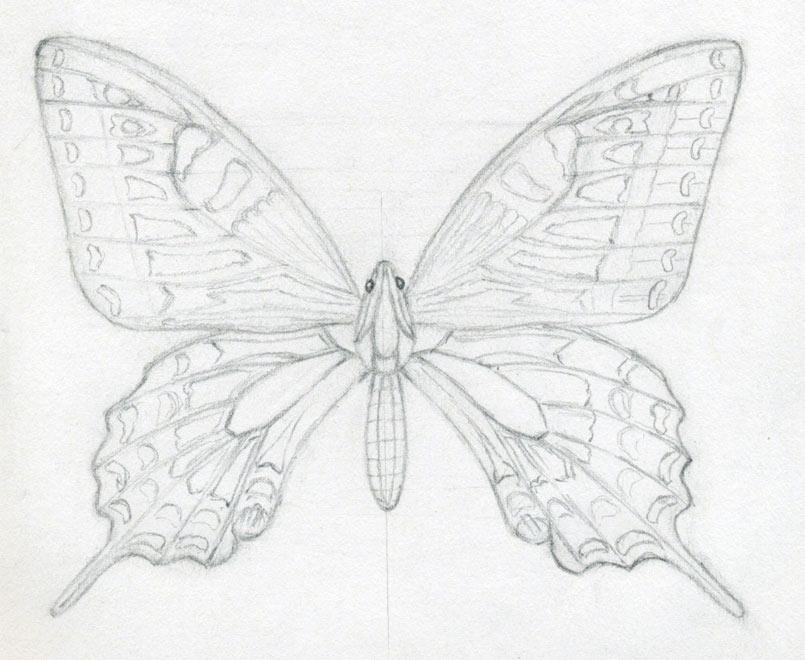
OK, at this stage you should have ready a basic blueprint for your butterfly. You can continue to fill it up with colored pencils or simply draw it only by graphite pencil.
click the image to enlarge
I colored the first layer in dark brown. The original color of this butterfly is between black and dark brown.Notice that I am leaving very thin lines blank among the patterns. These are the veins and they should be visible.
Make sure your pencil is sharpened well so that you will be able to draw thin lines.
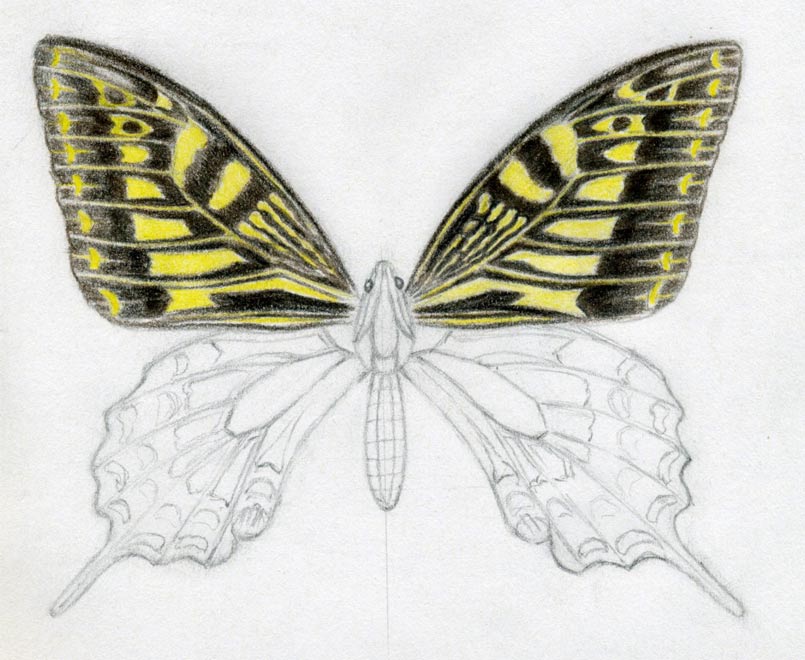
click the image to enlarge
Add black pencil coloring over the basic dark brown layer. Do not push the black color pencil too much.If you are not sure about which colors to mix, make tests on a separate paper. Make as many tests as necessary. It is a usual technique and commonly used among artists.
If you decided to draw a butterfly like this and spend your time with it, and I suppose you would like to make it as nice as possible then by all means make these color tests on separate paper.
It is only necessary in the beginning. Once you know which color pencils to mix then no more test are necessary.
While coloring, I would advice you to color (fill in) both front wings first. While coloring you are going more visual and your work suddenly starts to emerge from a previously obscure sketch.
The symmetry on the wings will be even more visible now, so it is good to draw the front wigs first and hind wings second.
click the image to enlarge
I used 2 color tones of yellow. Basic layer is lemon yellow and the top layer is more orange yellow.Do not sweat too much about colors if you draw with color pencils because you can never get it quite right. Consider the colors rather as symbols.
click the image to enlarge
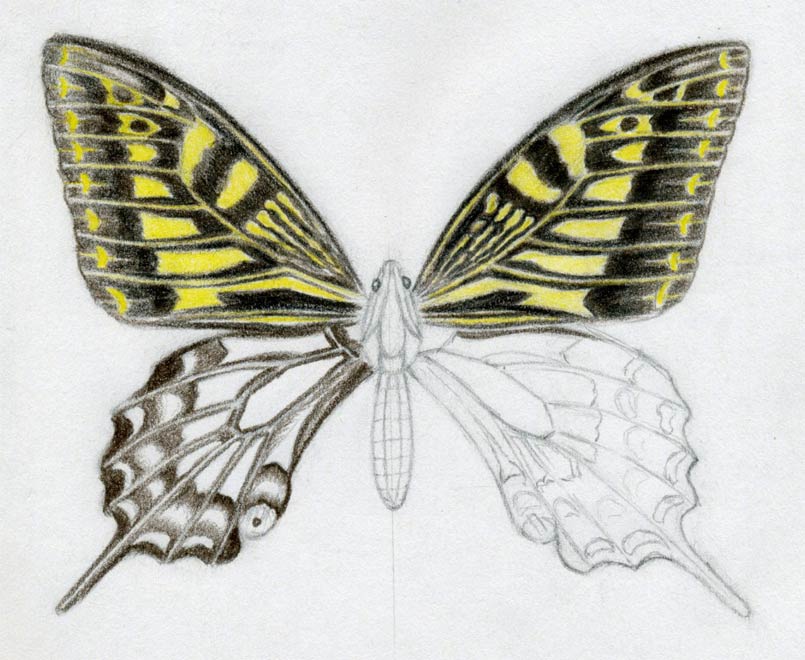
Color the hind wings of butterfly in similar fashion as the front wings. The process is the same.Notice however that there are such cloudy whiter spots on hind wings. These aren’t present on front wings.
