


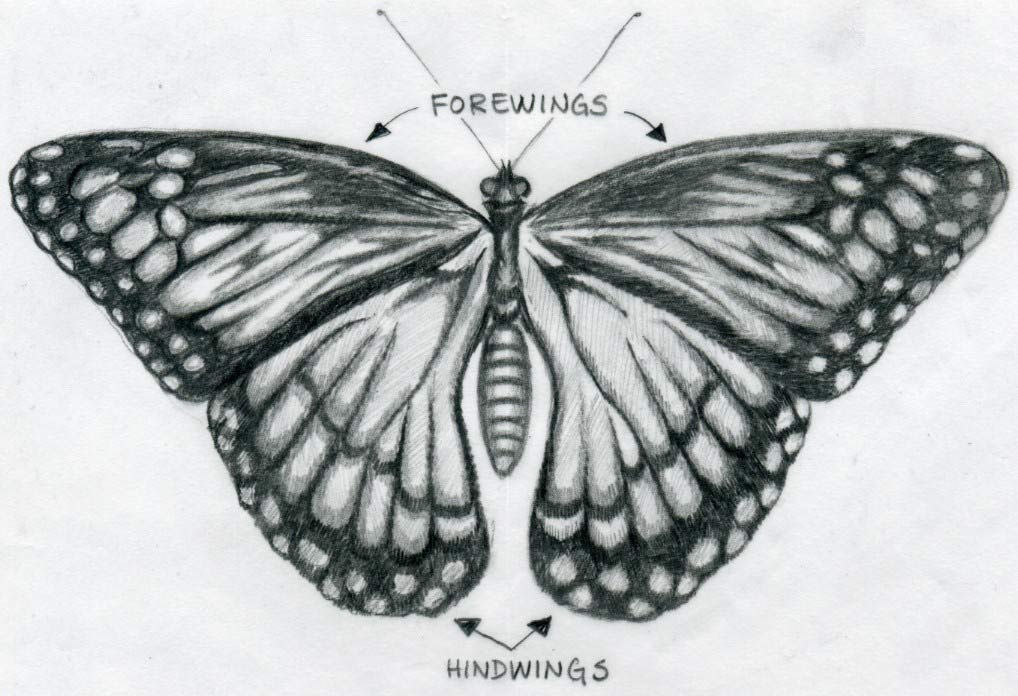
What butterfly drawings really are about? At first sight they may look like only a pair of opened wings and I think that might be the point. The wings. When you learn the basic patterns of butterfly wings, you can say you’ve learned how to make drawing of a butterfly.


The patterns, which look like a frame, are in fact the veins that nourish the butterfly’s wings.
Did you know that recent studies find that hind wings help make butterflies (and moths) quick turns during the flight to escape or evade predators? That is fantastic how Mother Nature takes detailed care for these beautiful colored creatures.
 If you catch butterflies, please take special care for their wings! They are too fragile and once they are broken, they cannot repair themselves and the butterfly will be unable to survive.
So, when you first attempt to make butterfly drawings, please do not worry about the exactness so much.

I cannot help but repeat this almost on every page, that you are a human not a camera. Be easy about it. You can never make a drawing perfect ;-)
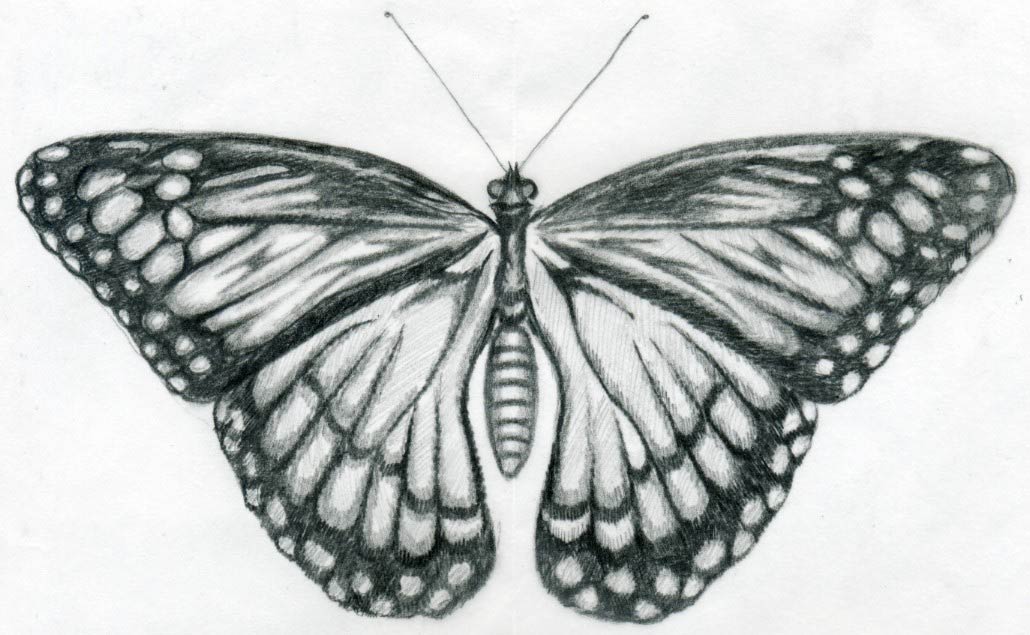
The easiest way is to draw one with opened wings, so that you can clearly see the size, the pattern and it is easy to copy.

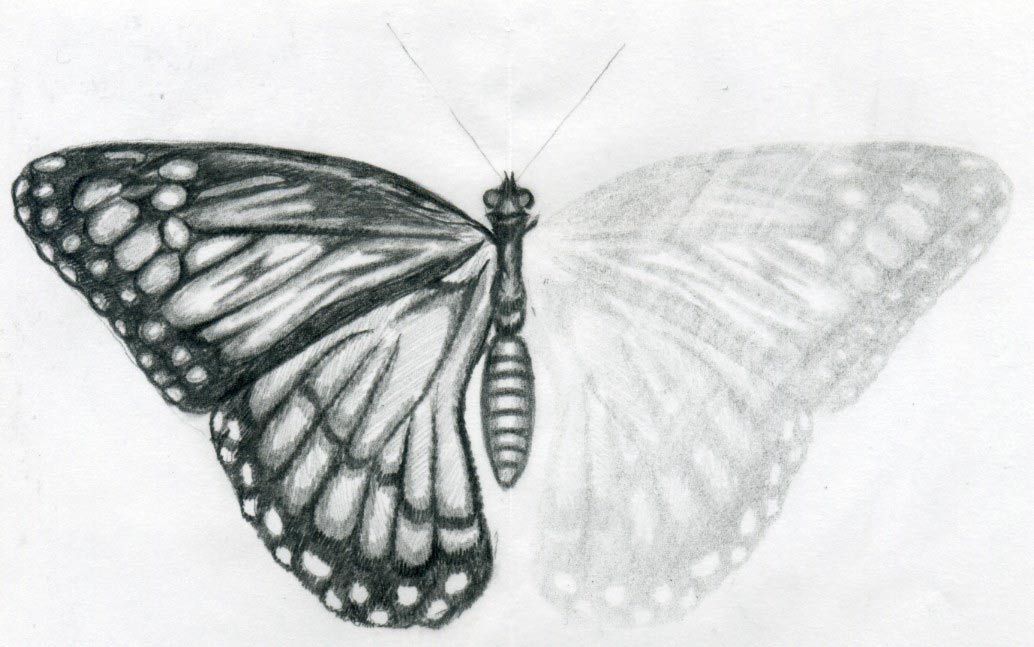
OK, so let’s draw the butterfly on the larger image on top of this page. Click on the image to open it in new tab or window and then observe the details of the pencil strokes. Ignore the wings description this time.
The drawing may appear to be pretty detailed if you look at it on the smaller image, but if you zoom it up, you will see that I did not care too much about the delicacy of the pencil strokes.

Click on the images and they will enlarge in new tab or window. Print it out and simply copy it. If you cannot copy it, then get yourself a tracing paper and simply trace it on the tracing paper.
Outline first the basic shape of the wings, the outer line and the “mosaic” on the wings. That will give you a basic idea where you will follow up with detailed pencil work.

Keep your drawing rather rough (not exact) because you can later get some creative ideas of your own. It really works that way!
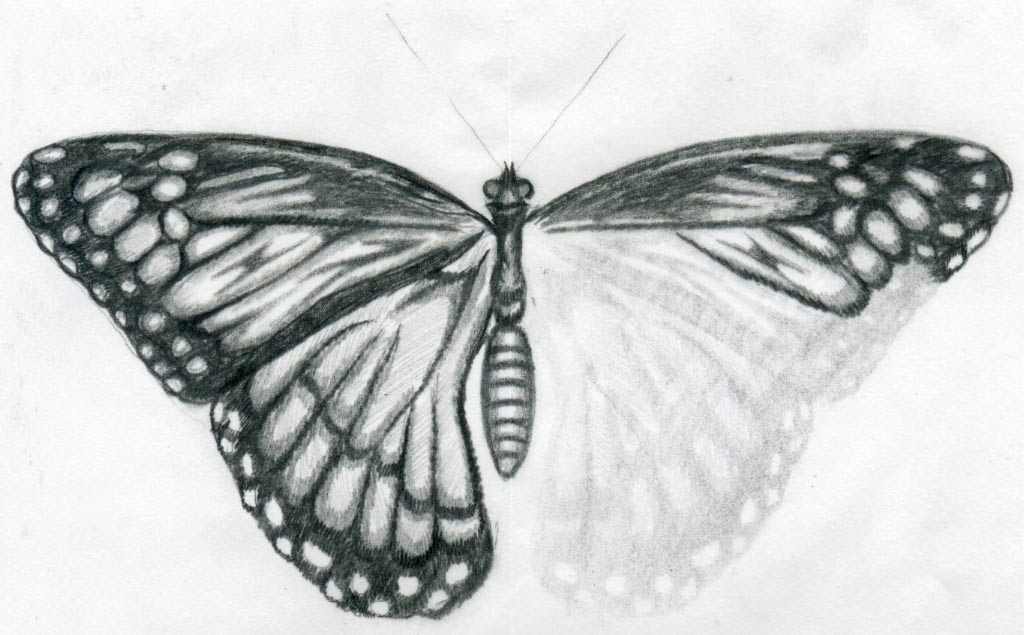
When you are ready with the basic wing frame you can start to create the pattern. Begin to shade from those parts that are the darkest or black.

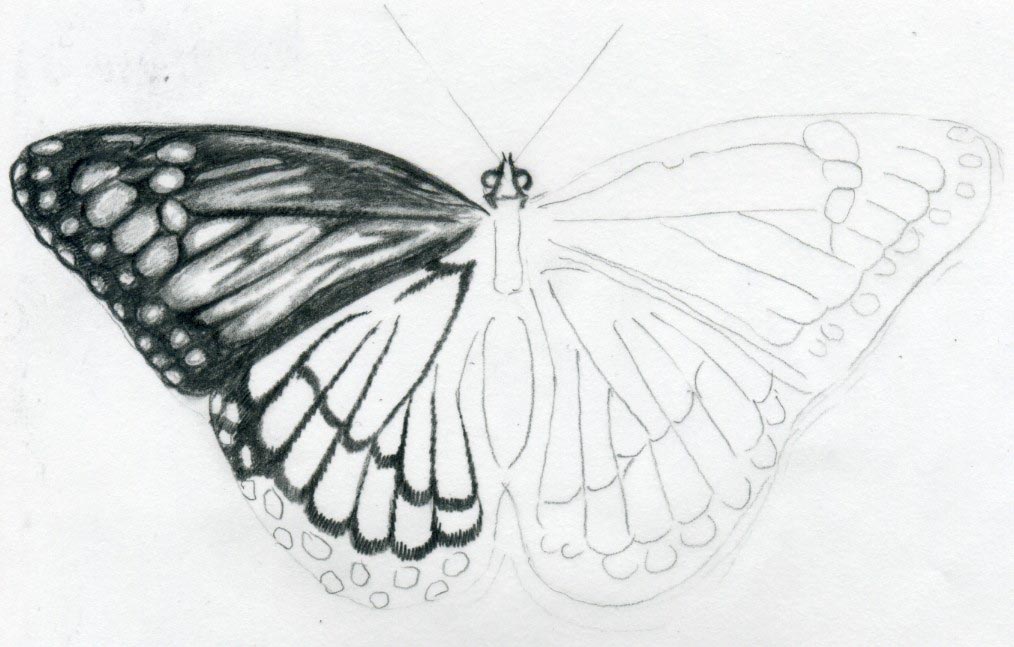
I started from the upper half on the left fore wing. Click on the image so that you can see it better in details how I shade each part on the wings.
You will easily notice that even on these simple butterfly pencil drawings, I used only three shade tones. Basically that is sufficient to complete a simple drawing.
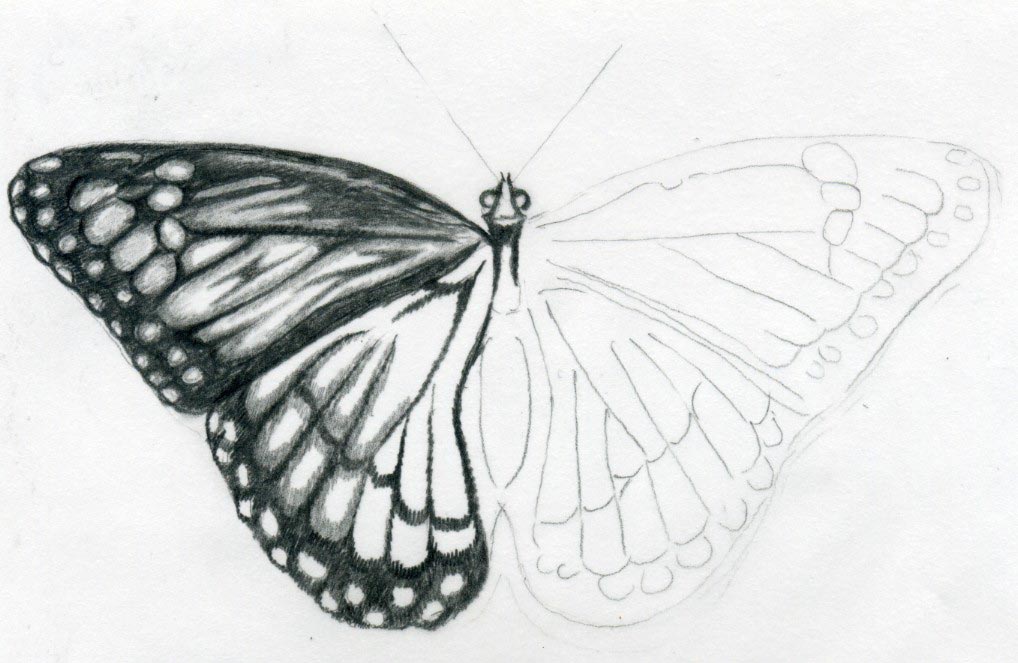
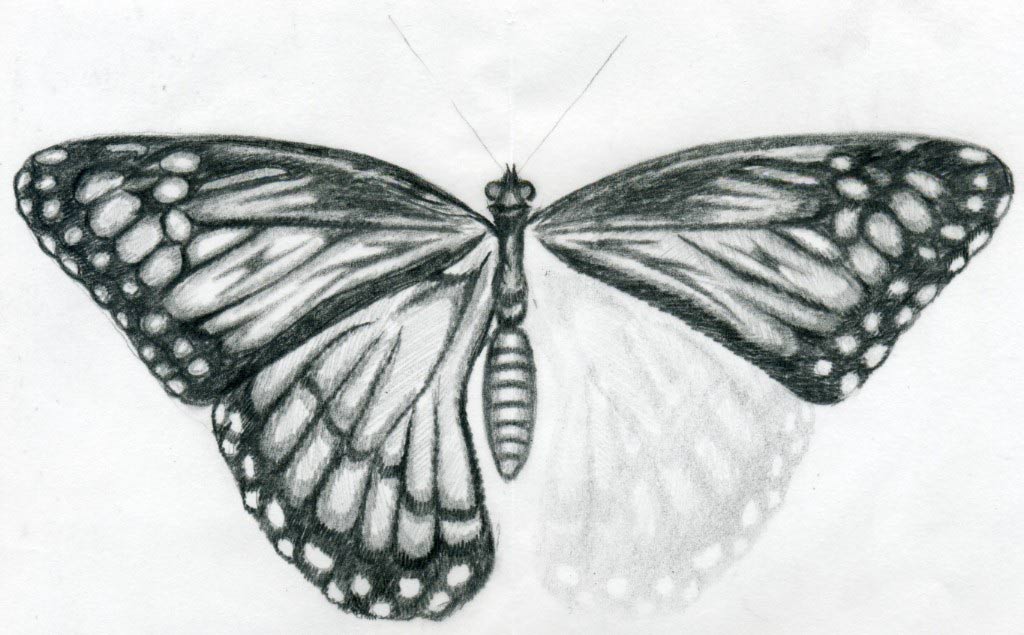
When you have ready the left half of the butterfly drawing, I would recommend you to fold the paper exactly in the middle of the butterfly body – along the body and flip the ready wing on the opposite side.

Then press the paper by your nails and “embed” the graphite pattern on the right side so that you will get a “print” of the left wing on the right side. This ensures that both sides – both wings will be equal, as you see on the image above.
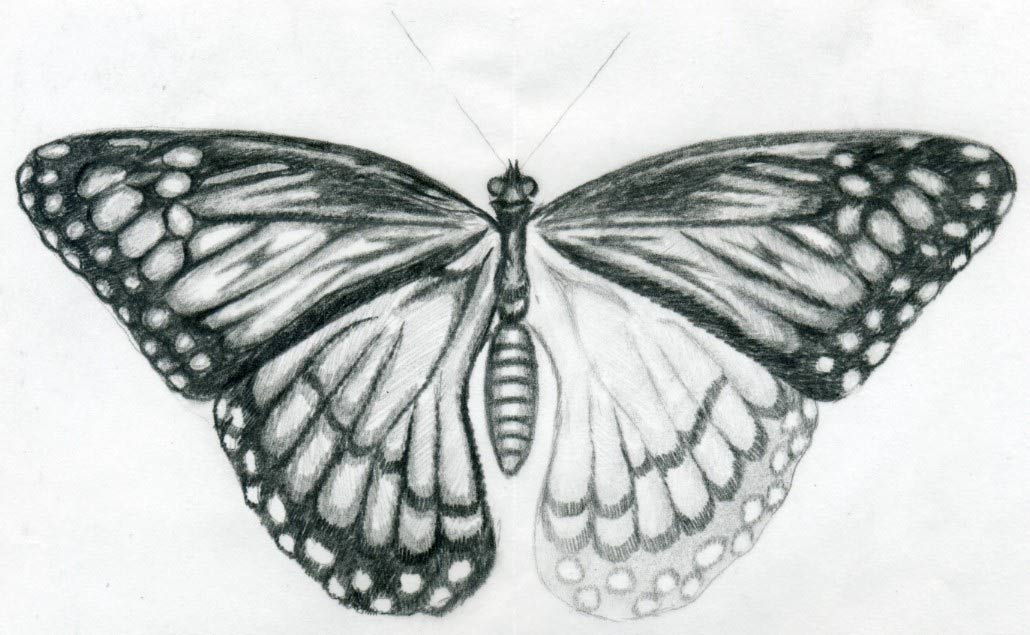
Then you simply “fill up” the right wing by pencil and voila (!), you’re done. It is pretty much like a kind of coloring page. The difference is that you use only pencil.
Click on the images to enlarge
Basically, every butterfly has 2 forewings and 2 hind wings, which structure resembles a little to a stained glass pattern. 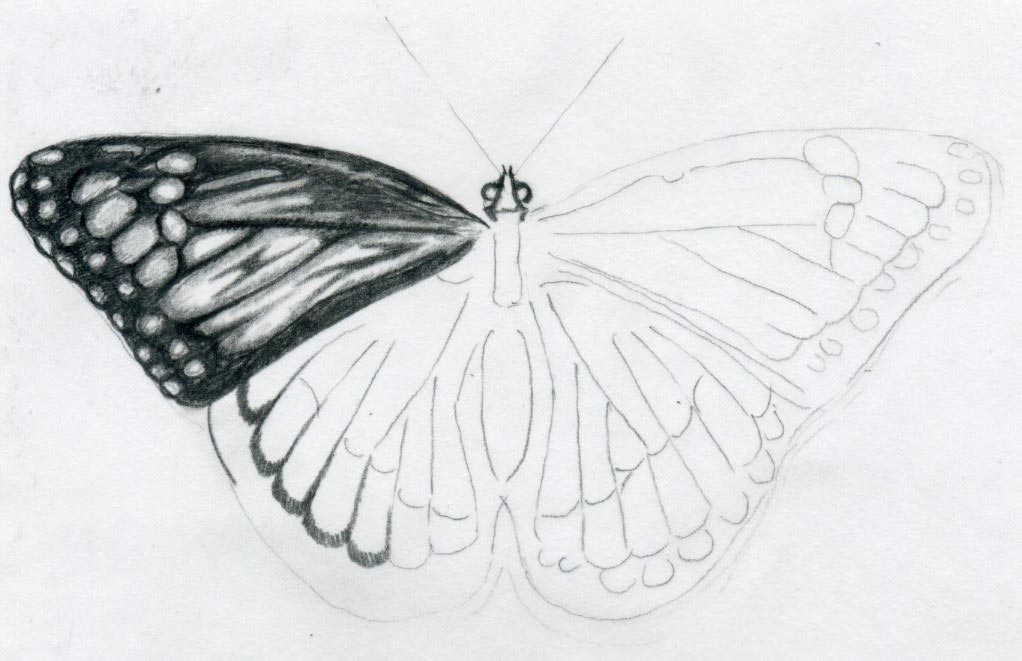
The patterns, which look like a frame, are in fact the veins that nourish the butterfly’s wings.
Did you know that recent studies find that hind wings help make butterflies (and moths) quick turns during the flight to escape or evade predators? That is fantastic how Mother Nature takes detailed care for these beautiful colored creatures.
 If you catch butterflies, please take special care for their wings! They are too fragile and once they are broken, they cannot repair themselves and the butterfly will be unable to survive.
So, when you first attempt to make butterfly drawings, please do not worry about the exactness so much.
I cannot help but repeat this almost on every page, that you are a human not a camera. Be easy about it. You can never make a drawing perfect ;-)
The easiest way is to draw one with opened wings, so that you can clearly see the size, the pattern and it is easy to copy.
OK, so let’s draw the butterfly on the larger image on top of this page. Click on the image to open it in new tab or window and then observe the details of the pencil strokes. Ignore the wings description this time.
The drawing may appear to be pretty detailed if you look at it on the smaller image, but if you zoom it up, you will see that I did not care too much about the delicacy of the pencil strokes.
Click on the images and they will enlarge in new tab or window. Print it out and simply copy it. If you cannot copy it, then get yourself a tracing paper and simply trace it on the tracing paper.
Outline first the basic shape of the wings, the outer line and the “mosaic” on the wings. That will give you a basic idea where you will follow up with detailed pencil work.
Keep your drawing rather rough (not exact) because you can later get some creative ideas of your own. It really works that way!
When you are ready with the basic wing frame you can start to create the pattern. Begin to shade from those parts that are the darkest or black.
I started from the upper half on the left fore wing. Click on the image so that you can see it better in details how I shade each part on the wings.
You will easily notice that even on these simple butterfly pencil drawings, I used only three shade tones. Basically that is sufficient to complete a simple drawing.
When you have ready the left half of the butterfly drawing, I would recommend you to fold the paper exactly in the middle of the butterfly body – along the body and flip the ready wing on the opposite side.
Then press the paper by your nails and “embed” the graphite pattern on the right side so that you will get a “print” of the left wing on the right side. This ensures that both sides – both wings will be equal, as you see on the image above.
Then you simply “fill up” the right wing by pencil and voila (!), you’re done. It is pretty much like a kind of coloring page. The difference is that you use only pencil.
