


Let’s draw a rabbit. I thought it would be helpful for you if I make some of the instructional material with a grid.
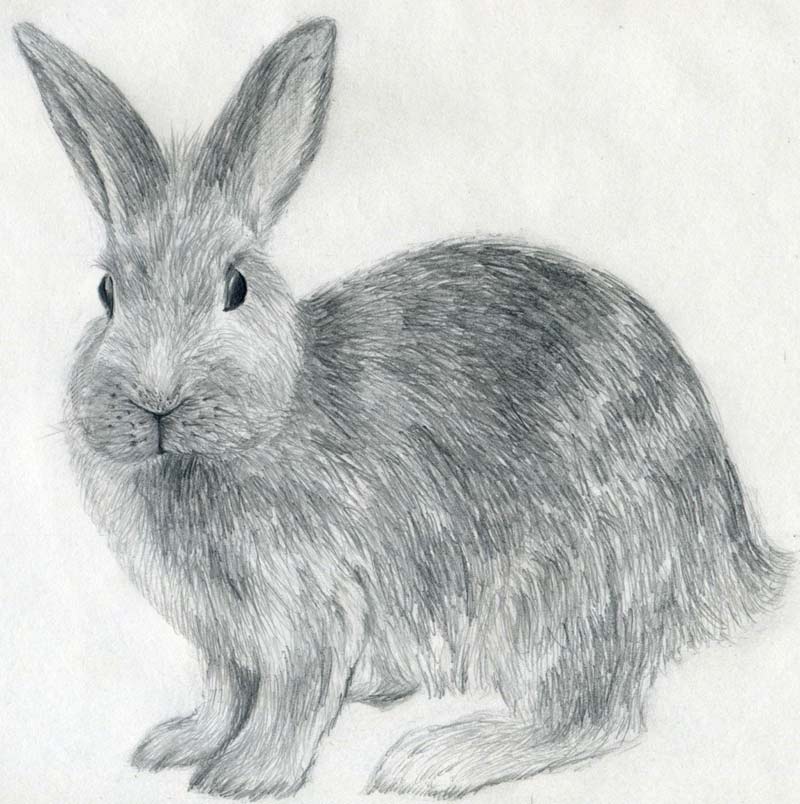
If you observe well the picture, you’ll notice that the drawing was made by simple, almost monotonous pencil strokes imitating the animal’s fur.
It is sometimes boring job, I know, but the final effect should satisfy you.
I would like you to notice the slight differences on the fur’s tones and shades, i.e., lighter and darker parts.
Drawing animal fur by pencil strokes is sometimes very deceptive because when you make the first strokes you may feel that you’ve just did it totally wrong.
It only looks like that because it is unfinished. If that’s the case, please continue to draw and use the eraser as less as possible.
You’ll need two pencils:
HB to enhance the darker parts and H to create thin pencil strokes that look like fur.


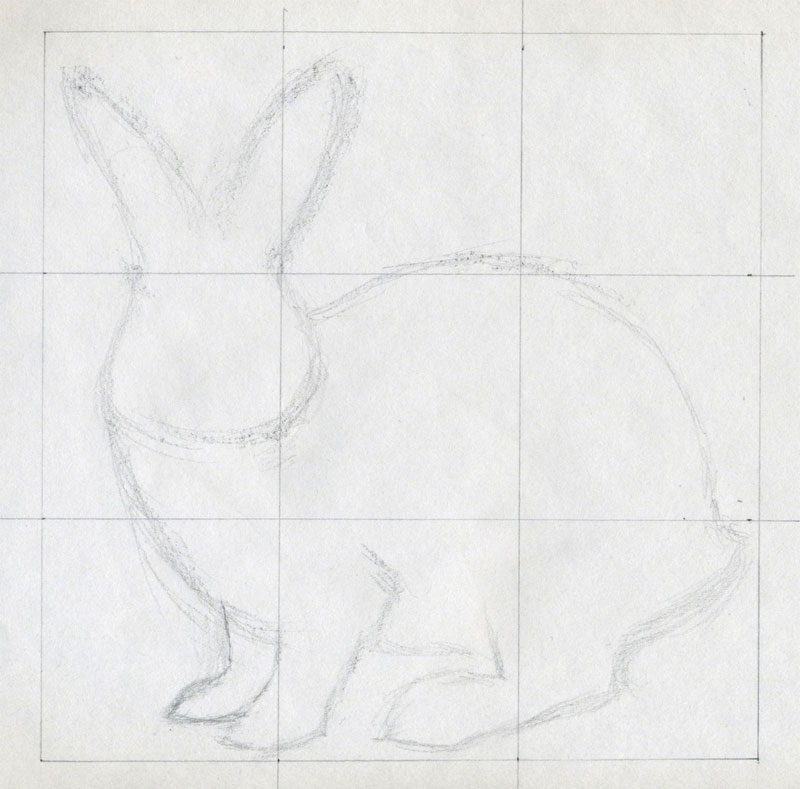
You can make a simple 3 x 3 grid of the same size squares if you like. The grid will help you draw a rabbit quicker and capture the outline contours more exactly.
Sketch the outline contours into the grid. Notice the points where the contours intersect the gridlines. Those points are your guides.


If you are not sure, please test the fur drawing (pencil strokes) on a separate paper.
Gradually erase only those parts of gridlines that directly interfere with areas you are working on.

Do not worry about shading at this stage. To draw a rabbit, or I should say to draw a rabbit’s fur takes a little more time than usual.
Be patient.
Enlarge the pictures and observe how I developed the strokes (fur). I am sure you can make them much, much better and nicer.

Notice how the rabbit’s body is round, nicely curved back-line. The fur strokes should be made in similar directions.
So, naturally, the fur strokes directly determine the shape of the body and its parts.

To draw a rabbit as perfectly as possible, you need to work out the animal’s face in as many details as possible.
Take your time and just continue stroking the fur all over the rabbit.
Fur on the head, ears or legs is shorter than the fur on the back or on the sides.

Always erase the grid lines on the parts you are working on.
If you forget to erase them, the grid lines will remain visible under the fur and you’ll have to erase it anyway. That may disturb your work.


One of the best ways to exercise would be to take a picture, print it out and draw it.
If you observe well the picture, you’ll notice that the drawing was made by simple, almost monotonous pencil strokes imitating the animal’s fur.
It is sometimes boring job, I know, but the final effect should satisfy you.
I would like you to notice the slight differences on the fur’s tones and shades, i.e., lighter and darker parts.
Drawing animal fur by pencil strokes is sometimes very deceptive because when you make the first strokes you may feel that you’ve just did it totally wrong.
It only looks like that because it is unfinished. If that’s the case, please continue to draw and use the eraser as less as possible.
You’ll need two pencils:
HB to enhance the darker parts and H to create thin pencil strokes that look like fur.
click the image to enlarge
click the image to enlarge
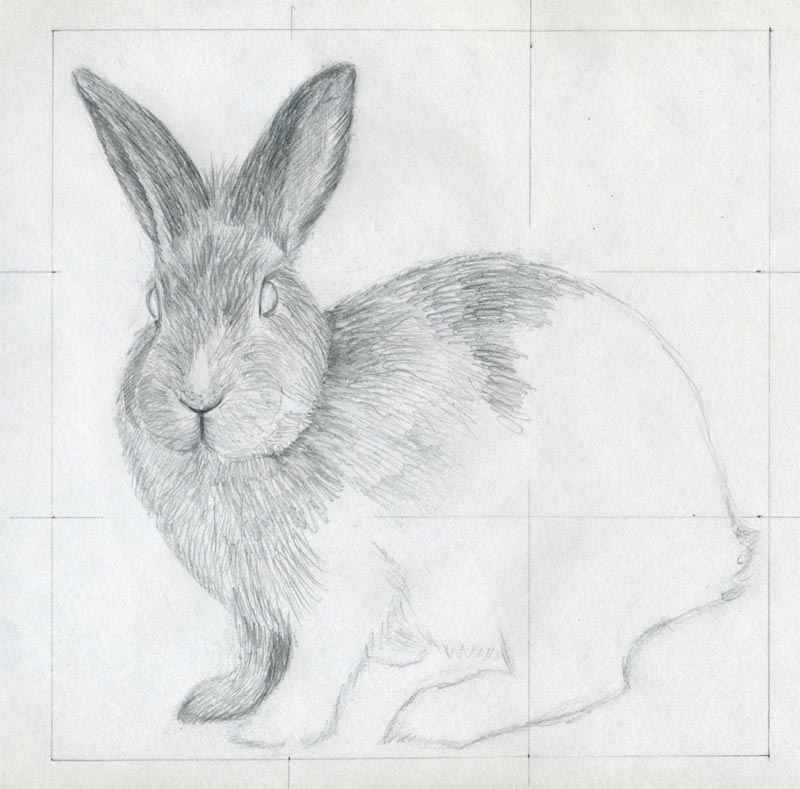
Use the HB pencil.You can make a simple 3 x 3 grid of the same size squares if you like. The grid will help you draw a rabbit quicker and capture the outline contours more exactly.
Sketch the outline contours into the grid. Notice the points where the contours intersect the gridlines. Those points are your guides.
click the image to enlarge
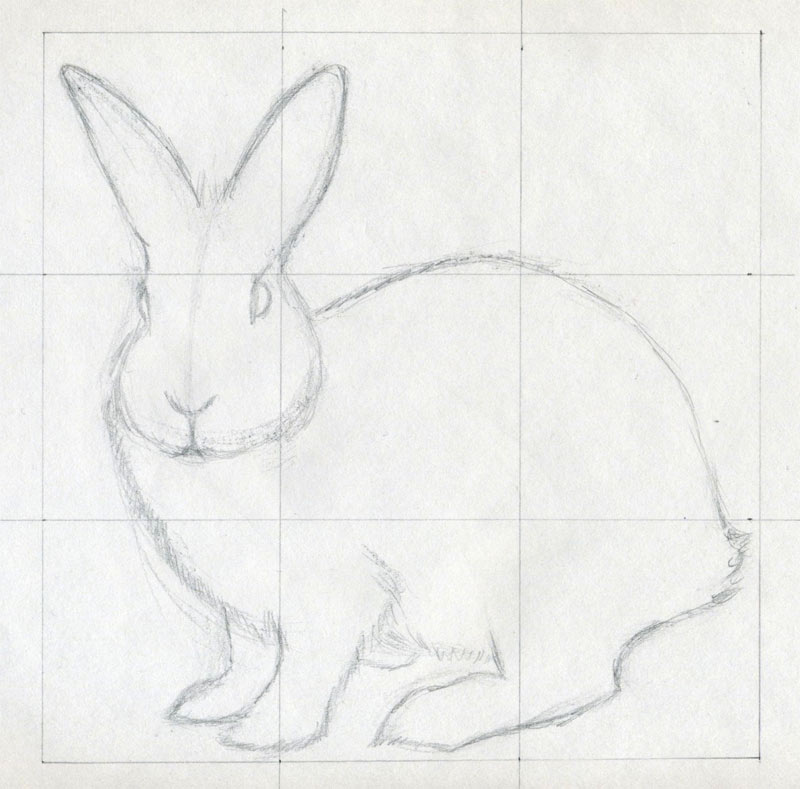
Refine the body contour and outline the facial features; eyes and nose. At this stage your rabbit is almost a perfectly shaped sketch.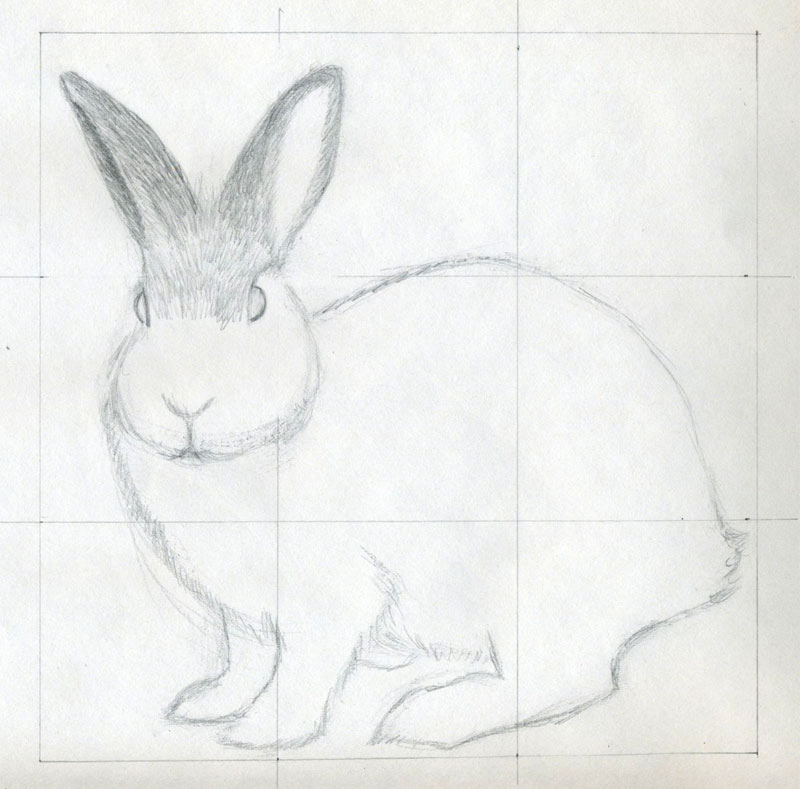
click the image to enlarge
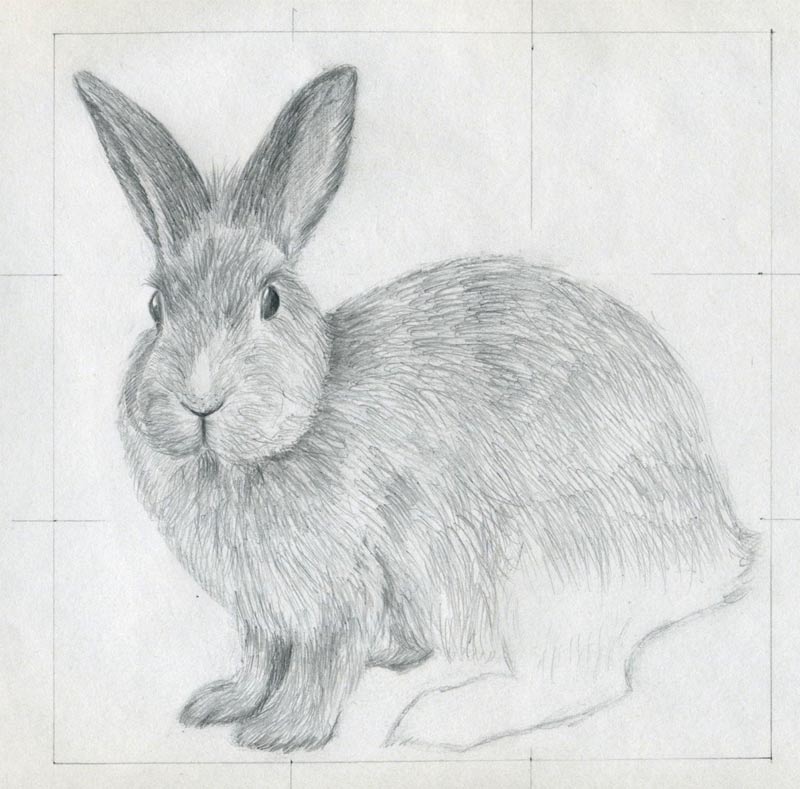
Erase unnecessary initial pencil strokes. Take your H pencil and begin to draw the fur on rabbit’s head and ears.If you are not sure, please test the fur drawing (pencil strokes) on a separate paper.
Gradually erase only those parts of gridlines that directly interfere with areas you are working on.

click the image to enlarge
Continue the H pencil strokes. Push the pencil gently. If you are not sure, make the strokes very light so you can have control over your drawing. Do not worry about shading at this stage. To draw a rabbit, or I should say to draw a rabbit’s fur takes a little more time than usual.
Be patient.
Enlarge the pictures and observe how I developed the strokes (fur). I am sure you can make them much, much better and nicer.
click the image to enlarge
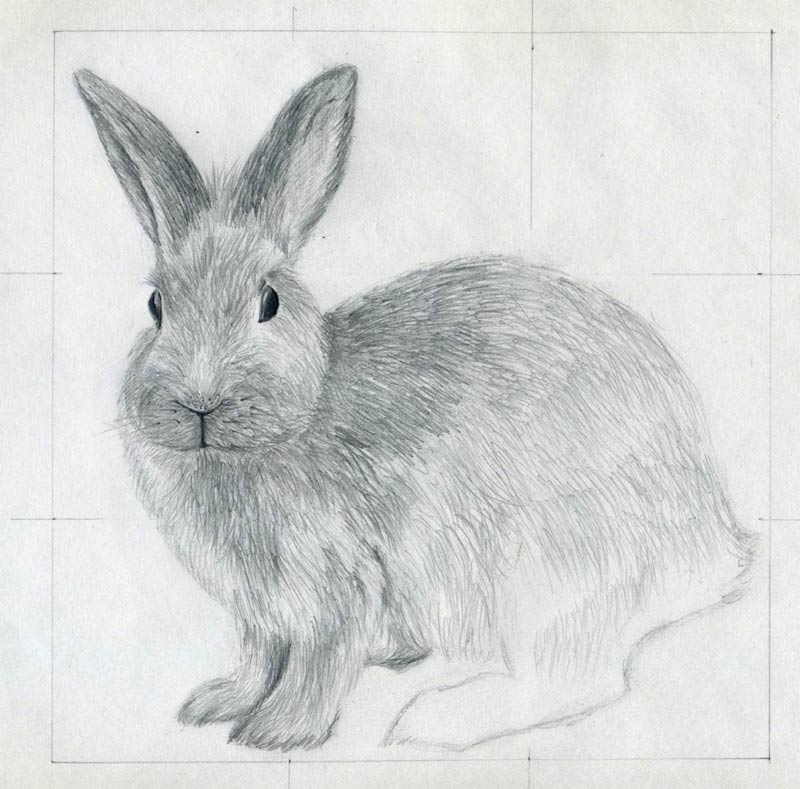
Continue the “fur-pencil-strokes” in similar fashion as you see on the pictures.Notice how the rabbit’s body is round, nicely curved back-line. The fur strokes should be made in similar directions.
So, naturally, the fur strokes directly determine the shape of the body and its parts.
click the image to enlarge
Work out the eyes and the area around the nose. To draw a rabbit as perfectly as possible, you need to work out the animal’s face in as many details as possible.
Take your time and just continue stroking the fur all over the rabbit.
Fur on the head, ears or legs is shorter than the fur on the back or on the sides.
click the image to enlarge
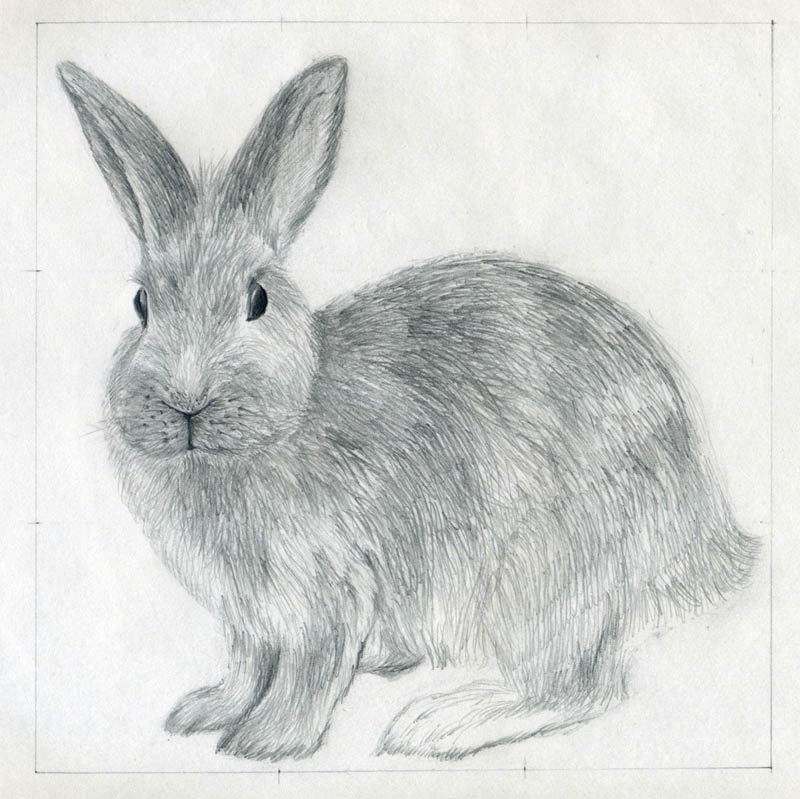
To give more value to the facial features, take the HB pencil and darken the necessary parts around nose and the eyes and those parts where you feel necessary.Always erase the grid lines on the parts you are working on.
If you forget to erase them, the grid lines will remain visible under the fur and you’ll have to erase it anyway. That may disturb your work.
click the image to enlarge
Refine the furs strokes on the legs and you can begin to shade the body parts. click the image to enlarge
If you have your own rabbit pet, you can draw a rabbit directly live in your room or backyard.One of the best ways to exercise would be to take a picture, print it out and draw it.
