


Whether you draw from a photo, or a live animal, whatever works for you is OK, but please observe carefully first every possible detail.
It is important to draw horse head in your mind, first.
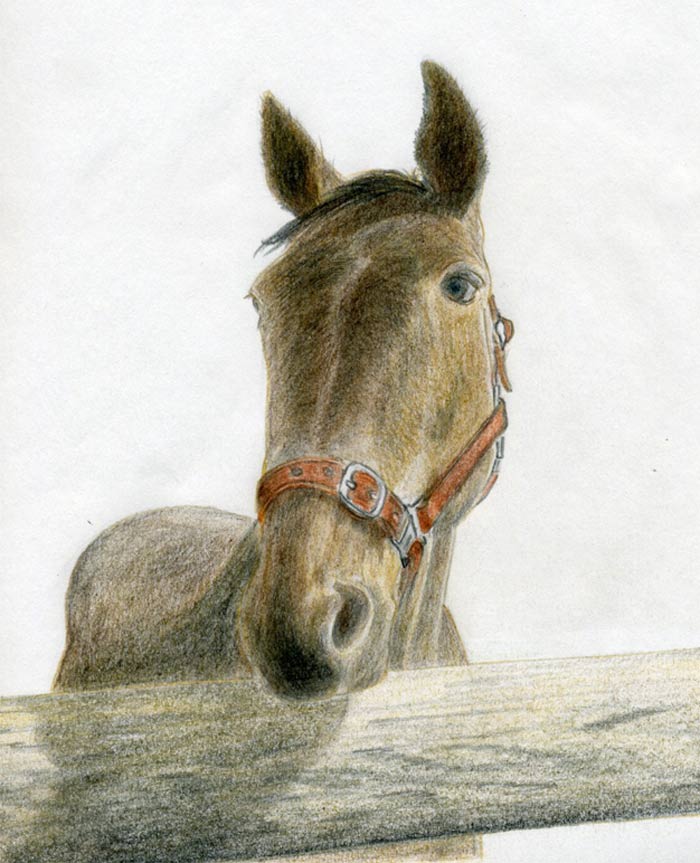
I purposely put more steps than necessary in order to make clear how the coloring and shading develops.
Please make your drawing better than mine!


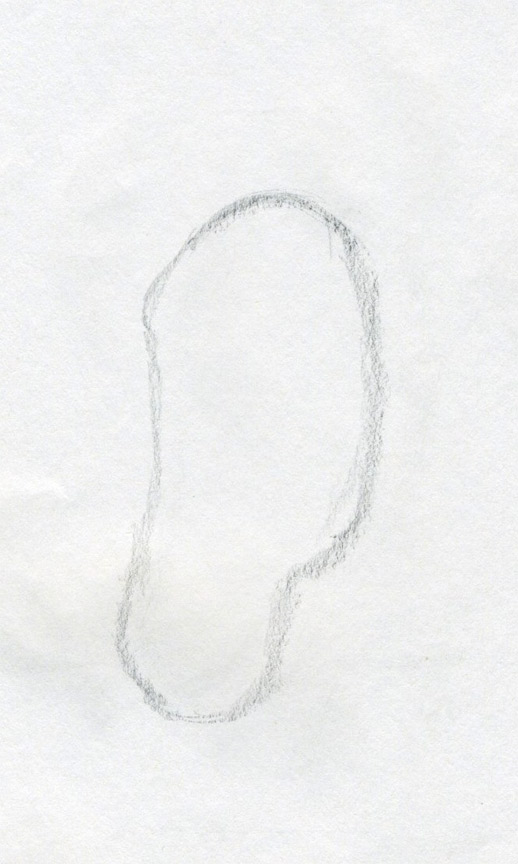
It should look something like this “potato” or “noodle”.
By capturing this first basic outline as accurately as possible, your remaining work is going to be very easy.
From now on you’ll proceed pretty fast because you already got right the most important basic head proportion.


The idea to draw horse head with part of the fence simply looks more natural.


By light brown color pencil, outline - in one single line - the horse head as you see on the picture.
Erase the initial graphite pencil “noise” so that you’ll get a single clear contour.
I recommend using a kneaded eraser instead of common plastic eraser.
Using kneaded eraser, no friction occurs between the paper and eraser because you erase by touching – stamping the paper by eraser.
If you do not have kneaded eraser handy, you can of course use and ordinary plastic eraser but get one as soon as possible. It really helps a lot.
Color the head and the rest of the body in one single flat color. No shading yet.

Continue to draw horse head as you see on the picture, using the same light brown color pencil.
Observe well the original object (photo, picture or a live animal). Notice where the color is dark brown – almost looks like black (inner part of the ears).
If you did not capture well the shape of the muzzle (the area of nose and lips), do it now.
Leave the head-gear blank. Coloring the head gear will be one of the last steps.

You’ll also need black pencil from now on.
Do not use graphite pencil to darken the drawing.
Graphite shines and will destroy color pencil drawing if mixed.
If possible, always make the pencil strokes in the direction of fur growth. It will look three dimensional and more realistic.
When you draw horse head, always make a basic flat coloring (light brown) first on which you will further develop (shade) other darker color tones.
Doing so, you’ll have a control over the shading process. You’ll be able to easily notice errors and correct them in time.


If you draw horse head, and you really want to be satisfied with your work, it is good if you take your time and work out the minimum necessary details.

If you are not sure, please practice first on a separate paper. By coloring the eyes your horse instantly gets a face expression. It is as if you give it a life.
Before you begin, sharpen your pencils (black and blue). You’ll have better control over the eye drawing if your pencil is sharper.
The blue color in the eyes is very weak almost invisible.

You may ask “when I draw horse head, do I need to draw this head gear?”. The answer is: “no”. It is an option.
You may erase it completely and draw the picture without it. You can still erase it if you do not feel like to draw it.
Add a basic light brown color to the horse fence.

Here, you can draw a landscape behind the horse or simply leaving the drawing as it is.
The reason I did not draw anything behind the animal is that the shape of the horse head is better visible on the white background, so that you can draw horse head better and draw it quickly.
I encourage you to add some landscape behind, even the simple grass and blue sky would make all the difference.
And remember, always make your drawing better than mine ;-)
It is important to draw horse head in your mind, first.
I purposely put more steps than necessary in order to make clear how the coloring and shading develops.
Please make your drawing better than mine!
click the image to enlarge
click the image to enlarge
Before you begin to draw horse head, first only in your mind, draw the imaginary contours of the head. It should look something like this “potato” or “noodle”.
By capturing this first basic outline as accurately as possible, your remaining work is going to be very easy.
From now on you’ll proceed pretty fast because you already got right the most important basic head proportion.
click the image to enlarge
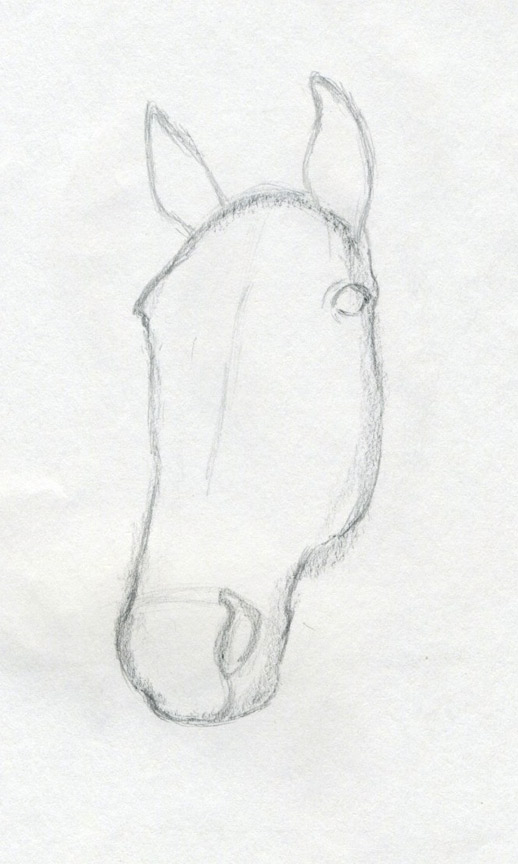
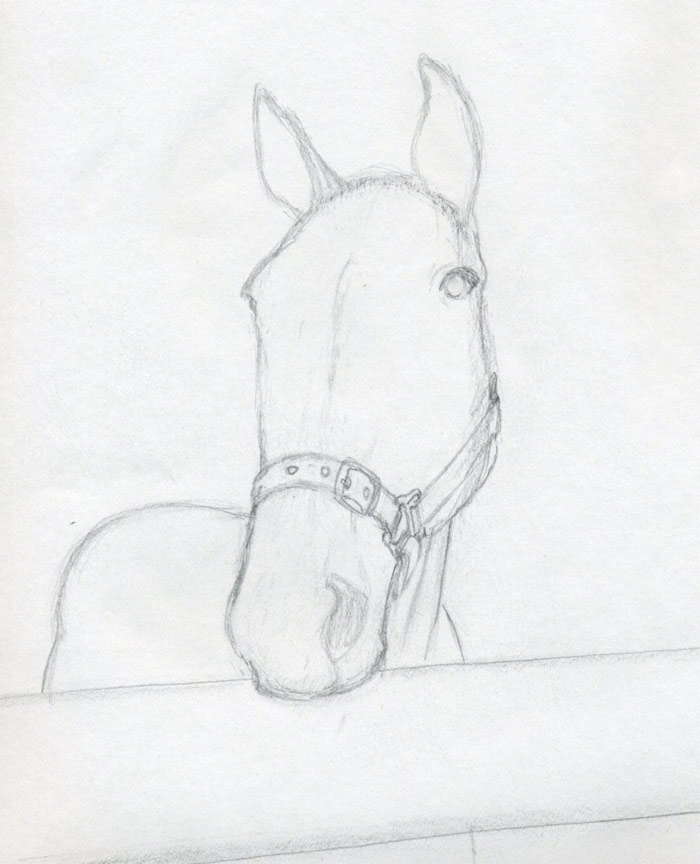
Draw the ears and outline the nostrils and the eyes. Do not hurry here, rather slowly but precisely is the best way.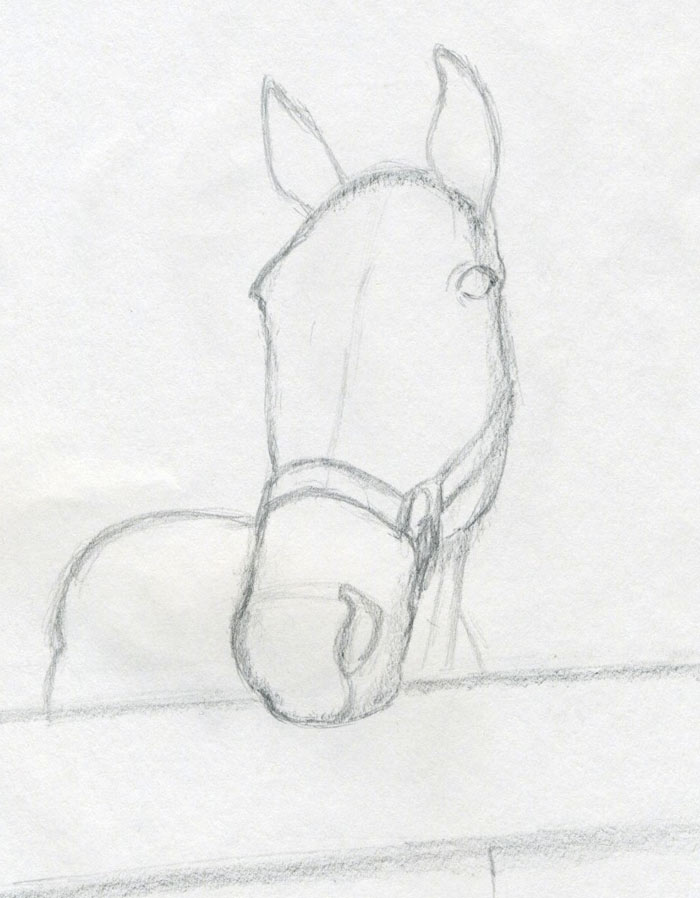
click the image to enlarge
Sketch the rest of the visible part of horse’s body. Outline the upper rail of the wooden round log horse fence and the head gear.The idea to draw horse head with part of the fence simply looks more natural.
click the image to enlarge
Outline the approximate details on the headgear. A well sharpened pencil will be very helpful here.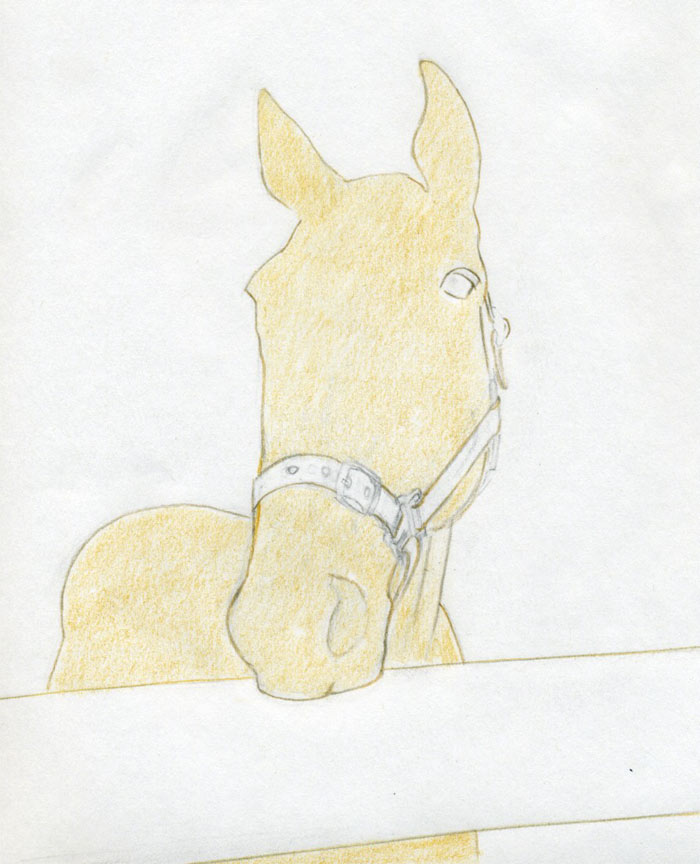
click the image to enlarge
Refine the basic outline contours. Correct where you feel necessary, so that you’ll get a perfect horse head template you can use anytime later if necessary.By light brown color pencil, outline - in one single line - the horse head as you see on the picture.
Erase the initial graphite pencil “noise” so that you’ll get a single clear contour.
I recommend using a kneaded eraser instead of common plastic eraser.
Using kneaded eraser, no friction occurs between the paper and eraser because you erase by touching – stamping the paper by eraser.
If you do not have kneaded eraser handy, you can of course use and ordinary plastic eraser but get one as soon as possible. It really helps a lot.
Color the head and the rest of the body in one single flat color. No shading yet.
click the image to enlarge
ShadingContinue to draw horse head as you see on the picture, using the same light brown color pencil.
Observe well the original object (photo, picture or a live animal). Notice where the color is dark brown – almost looks like black (inner part of the ears).
If you did not capture well the shape of the muzzle (the area of nose and lips), do it now.
Leave the head-gear blank. Coloring the head gear will be one of the last steps.
click the image to enlarge
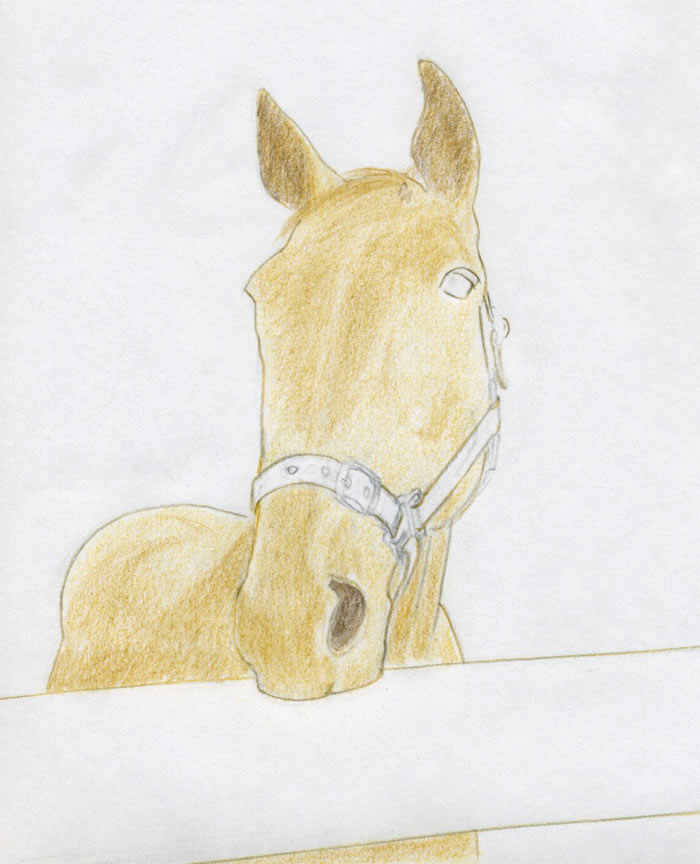
Take a dark brown color pencil and start to shade the darker parts on the head.You’ll also need black pencil from now on.
Do not use graphite pencil to darken the drawing.
Graphite shines and will destroy color pencil drawing if mixed.
If possible, always make the pencil strokes in the direction of fur growth. It will look three dimensional and more realistic.
When you draw horse head, always make a basic flat coloring (light brown) first on which you will further develop (shade) other darker color tones.
Doing so, you’ll have a control over the shading process. You’ll be able to easily notice errors and correct them in time.
click the image to enlarge
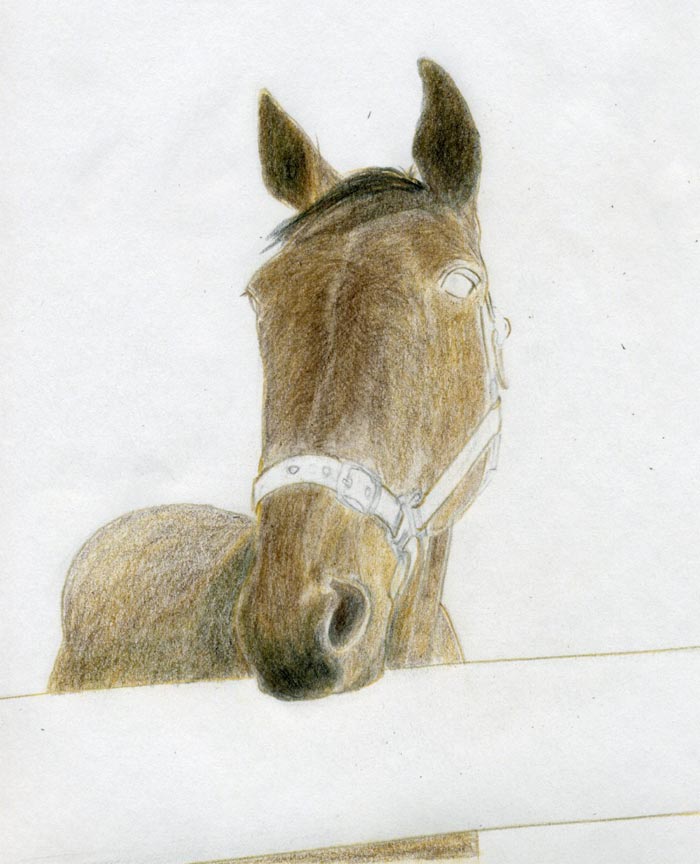
Add – shade - further the darker parts. Especially the muzzle, nostrils and the inner area of the ears.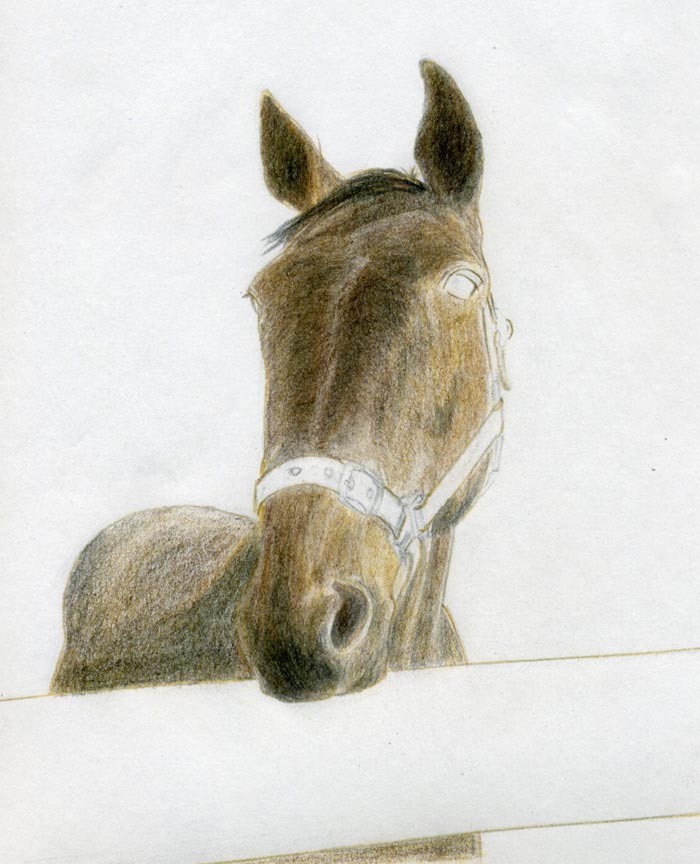
click the image to enlarge
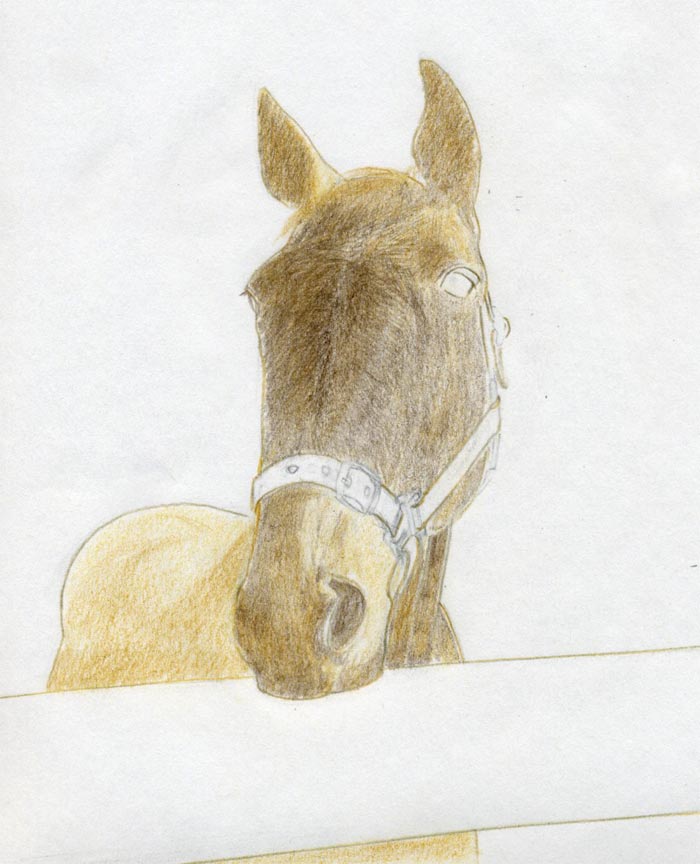
I know, each step may look like a lot of work. It is. I intentionally upload this picture too, so that you can see even better how the shading develops in small steps.If you draw horse head, and you really want to be satisfied with your work, it is good if you take your time and work out the minimum necessary details.
click the image to enlarge
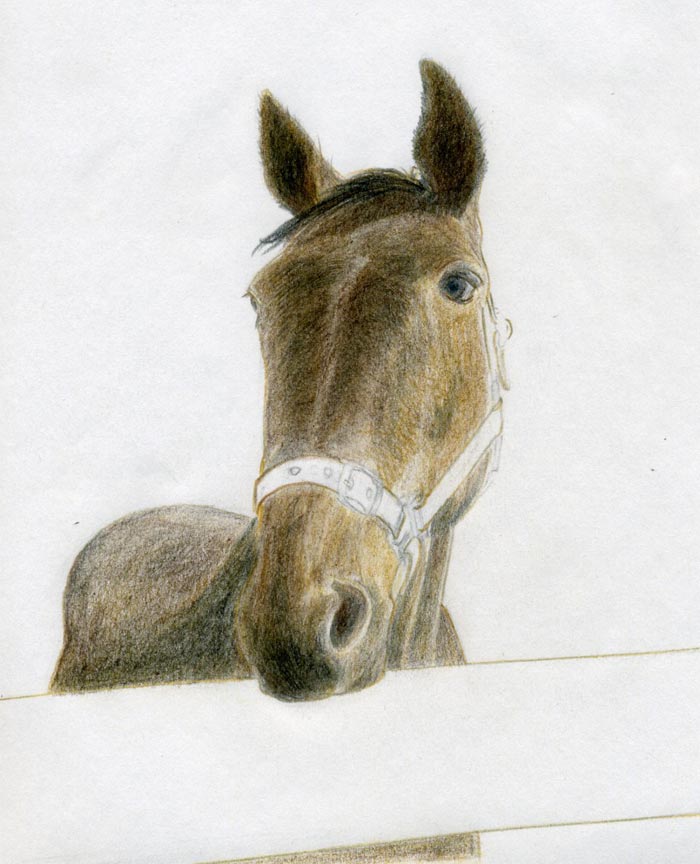
The moment of truth. Let’s color the eyes. You’ll need a dark blue and a black color pencil. If you are not sure, please practice first on a separate paper. By coloring the eyes your horse instantly gets a face expression. It is as if you give it a life.
Before you begin, sharpen your pencils (black and blue). You’ll have better control over the eye drawing if your pencil is sharper.
The blue color in the eyes is very weak almost invisible.

click the image to enlarge
Now you can begin to add color to the head gear. Chose whatever color you like, but chose different color tone than color of the head itself.You may ask “when I draw horse head, do I need to draw this head gear?”. The answer is: “no”. It is an option.
You may erase it completely and draw the picture without it. You can still erase it if you do not feel like to draw it.
Add a basic light brown color to the horse fence.
click the image to enlarge
Work out the wooden surface of the upper rail on horse fence and add the shade.Here, you can draw a landscape behind the horse or simply leaving the drawing as it is.
The reason I did not draw anything behind the animal is that the shape of the horse head is better visible on the white background, so that you can draw horse head better and draw it quickly.
I encourage you to add some landscape behind, even the simple grass and blue sky would make all the difference.
And remember, always make your drawing better than mine ;-)
