


How to draw a penguin looks so easy, doesn’t it? Yes, it is easy and almost effortless to draw and, we’ll soon see why.
For me, penguin means a cute, black & white walking bird.
The shape of a penguin’s body is very simple indeed.
Instead for walking penguin was probably created for swimming because penguin is an excellent super fast swimmer and diver.
It took me a while till I picked a “perfect penguin” that would be easy to draw in few simple steps. As you may already know there are about 17 species of penguins.
My advice is, first, learn how to draw a penguin here, learn the basic steps and procedure and then go and pick your favorite among other species and draw it.

What does he do? Where is the penguin looking or staring? It seems that he just spotted something on the side or it may be that he observes an object or a situation.
Body of the penguin is slightly leaned to the side.
Can you see that? It looks like as penguin would begin to walk there in the next moment.
Very helpful method when you draw an animal is to draw it with/by circles and ellipses.
I think this method especially fits when you want to learn how to draw a penguin because of its round body shape.
It is nearly impossible to make a mistake here. Simply adjust the shape of a penguin to the circles. Yes, it is that simple.

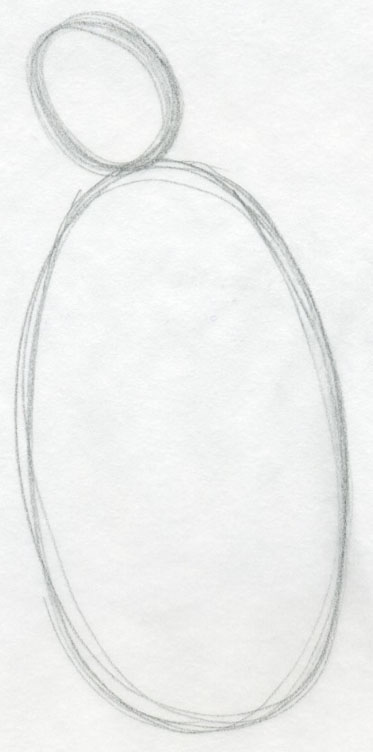
Draw two ellipses, something similar as if you were drawing a snowman. See that the ellipses I drew are consisting of many lines crossing each other.
It is not necessary to draw a perfect ellipse in the beginning. Relax and gently draw as many lines as you consider necessary. We’ll erase them in following steps.

On the bird’s head draw a weak line representing the center of the beak. This is the direction where the penguin has its head turned to.
Large ellipse on the body and small circle are the basis that serves us to get an idea about the total size of a penguin.

Click on the image to enlarge, so that you can see clearly how the drawing progresses.
Draw weak lines marking the border between black head and white belly. Also, there is a white spot around the eye expanding towards the top of the head.

The beak is also two-colored. In our drawing, it is only black and grey but this must be visible in order to make the penguin drawing look more realistic.
The fun of drawing penguin by pencil is that it doesn’t require any difficult shading


Start to shade the head by short pencil strokes. Make the lighter tone first, a darker grey. See how rough strokes I make. The only point is the strokes should be directed from the top of the head along the neck. Click on the image to enlarge to see the strokes close up.
When you draw a penguin’s eyes make a tiny little white spot as the light reflection so that the eye looks alive and sharp.

OK, let’s make some final adjustments. There is a shade on the belly under the wing, can you see that? And do not forget the tail!
It is somehow hidden but for the penguin tail means a lot because penguins use the tail as a kind of supporter, a third leg while they standing or sitting.

Be easy with the pencil because the belly is white.
Well, there you go. I think you have now learned how to draw a penguin. Was it easier than you imagined. Of course it was. I think you did a very good job!
For me, penguin means a cute, black & white walking bird.
The shape of a penguin’s body is very simple indeed.
Instead for walking penguin was probably created for swimming because penguin is an excellent super fast swimmer and diver.
It took me a while till I picked a “perfect penguin” that would be easy to draw in few simple steps. As you may already know there are about 17 species of penguins.
My advice is, first, learn how to draw a penguin here, learn the basic steps and procedure and then go and pick your favorite among other species and draw it.

click the image to enlarge
Let’s observe the body language of this penguin for a moment. It will help you to draw it better and easier.
Notice the signs of this body language while you learn how to draw a penguin.What does he do? Where is the penguin looking or staring? It seems that he just spotted something on the side or it may be that he observes an object or a situation.
Body of the penguin is slightly leaned to the side.
Can you see that? It looks like as penguin would begin to walk there in the next moment.
Very helpful method when you draw an animal is to draw it with/by circles and ellipses.
I think this method especially fits when you want to learn how to draw a penguin because of its round body shape.
It is nearly impossible to make a mistake here. Simply adjust the shape of a penguin to the circles. Yes, it is that simple.
click the image to enlarge
The penguin we are about to draw has its head turned upward on the side. So the beak is visible in its entire length and thus it is easy to draw.Draw two ellipses, something similar as if you were drawing a snowman. See that the ellipses I drew are consisting of many lines crossing each other.
It is not necessary to draw a perfect ellipse in the beginning. Relax and gently draw as many lines as you consider necessary. We’ll erase them in following steps.

click the image to enlarge
Now, mark the wings of a penguin by simple one line, just make a rough sketch of a wing as you see on the picture. On the bird’s head draw a weak line representing the center of the beak. This is the direction where the penguin has its head turned to.
Large ellipse on the body and small circle are the basis that serves us to get an idea about the total size of a penguin.

click the image to enlarge
You can now make joints – draw a neck between the head circle and the body. Just observe the drawing and do it as I did. Click on the image to enlarge, so that you can see clearly how the drawing progresses.
Draw weak lines marking the border between black head and white belly. Also, there is a white spot around the eye expanding towards the top of the head.

click the image to enlarge
If you encounter some difficulties or find a bit difficult to observe the black and white picture, click on the direct link above Gentoo Penguin, it will take you to Wikipedia to see the color photo.The beak is also two-colored. In our drawing, it is only black and grey but this must be visible in order to make the penguin drawing look more realistic.
The fun of drawing penguin by pencil is that it doesn’t require any difficult shading

click the image to enlarge
OK, now you have erased unnecessary lines from the initial ellipses and you have a nicely shaped body of a penguin.
click the image to enlarge
Draw the wings on both sides. Penguin is a swimmer and therefore the wings resemble rather to fins. They quite resemble to a perfectly shaped shark’s pectoral fin.Start to shade the head by short pencil strokes. Make the lighter tone first, a darker grey. See how rough strokes I make. The only point is the strokes should be directed from the top of the head along the neck. Click on the image to enlarge to see the strokes close up.
When you draw a penguin’s eyes make a tiny little white spot as the light reflection so that the eye looks alive and sharp.
click the image to enlarge
There are some white spots on the wings (fins) too, these should be marked there too.OK, let’s make some final adjustments. There is a shade on the belly under the wing, can you see that? And do not forget the tail!
It is somehow hidden but for the penguin tail means a lot because penguins use the tail as a kind of supporter, a third leg while they standing or sitting.
click the image to enlarge
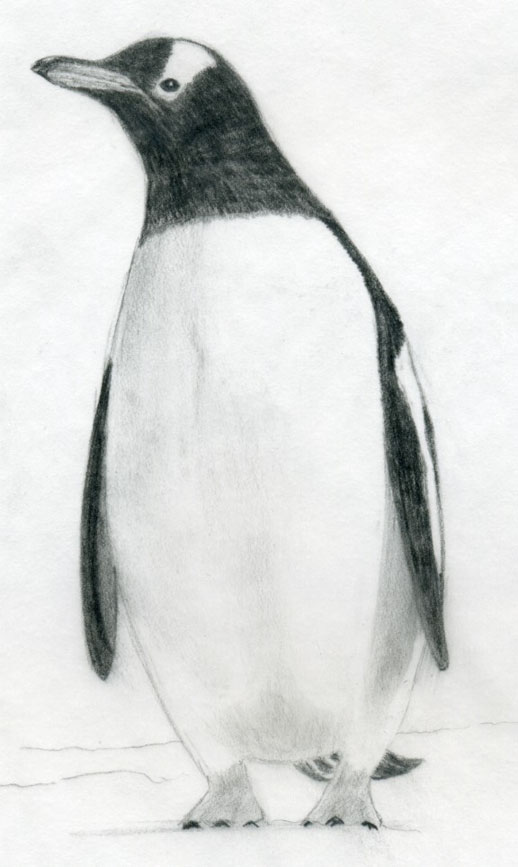
Notice the very weak shades on the belly, right above the legs area and on the side under the neck. Carefully and gently shade these parts. Be easy with the pencil because the belly is white.
Well, there you go. I think you have now learned how to draw a penguin. Was it easier than you imagined. Of course it was. I think you did a very good job!
