


Learn how to draw a frog is definitely one of the most rewarding endeavors. The theme about frogs is huge and if you know how to quickly sketch or draw one without actually seeing it - from memory - is very helpful and convenient.
Let’s say you are writing a summer holiday postcard to someone (..and this is just one little example). Wouldn’t be nice and cute if you could decorate it with an illustration of a little frog?
After going through this exercise you will know how to draw a frog easily….and….most importantly from memory!
Did you know that frog uses his eyes not only for watching but the eyes serves as a pump to push down the meal into the throat? That is why frogs close their eyes and, the eyes go down into his head while swallowing a meal. Frogs live from 4 to 15 years in average? They use the “Tympanum” ( small round membrane diagonally under the eyes) for hearing.
Frogs are featured in some cultures and fairy tales as ugly creatures with hidden talents. They have been often used as themes for art like mosaics for instance.
In Japan, anime frog is often used as a cute character for decoration and patterns on many home accessories, towels, etc.
Frog in Japanese is = kaeru.
On this frog drawing I am going to show you a simple and easy way how to draw one.


The point is to capture the final shape and size of the frog.


This part should be called “how to erase a frog” instead of “how to draw a frog”, because now you are working mainly with eraser.
When you have erased all the excess - junk pencil lines, your picture should look similar to this or better. We can say that your frog drawing is almost ready.


Also draw the details of the webbed foot. The webs are especially visible on hind legs.

So, at this point you should have a ready, complete frog drawing and, know how to draw a frog. Make your drawing better than this one!
If you really made it till here, I would recommend you to search for a frog on google images (chose large ones) and sketch and draw one directly from the monitor of your computer.
Let’s say you are writing a summer holiday postcard to someone (..and this is just one little example). Wouldn’t be nice and cute if you could decorate it with an illustration of a little frog?
After going through this exercise you will know how to draw a frog easily….and….most importantly from memory!
Did you know that frog uses his eyes not only for watching but the eyes serves as a pump to push down the meal into the throat? That is why frogs close their eyes and, the eyes go down into his head while swallowing a meal. Frogs live from 4 to 15 years in average? They use the “Tympanum” ( small round membrane diagonally under the eyes) for hearing.
Frogs are featured in some cultures and fairy tales as ugly creatures with hidden talents. They have been often used as themes for art like mosaics for instance.
In Japan, anime frog is often used as a cute character for decoration and patterns on many home accessories, towels, etc.
Frog in Japanese is = kaeru.
On this frog drawing I am going to show you a simple and easy way how to draw one.

click the image to enlarge
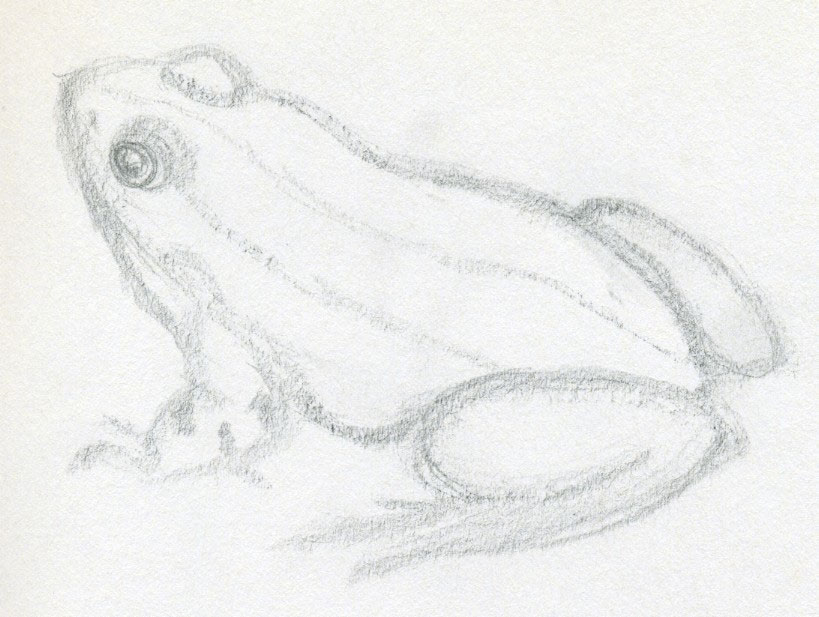
Outline the trunk of the frog by light pencil line(s). Draw as many lines as necessary, you will erase the junk later. Tilt the pencil and draw by the side of the graphite, you will make much better and exact lines.
click the image to enlarge
Add the legs and outline the eyes. Notice how I sketched the legs first by ovals consisting of many lines piled up on each other. It is OK at this stage. The point is to capture the final shape and size of the frog.
click the image to enlarge
You can point out the eyes. Highlight the light reflection on the eyes, but not too sharply yet. Draw the lines along the frog’s back.
click the image to enlarge
Highlight a bit more the trunk (frog’s back) lines, so that you will not lose while shading to darker color tone during next steps.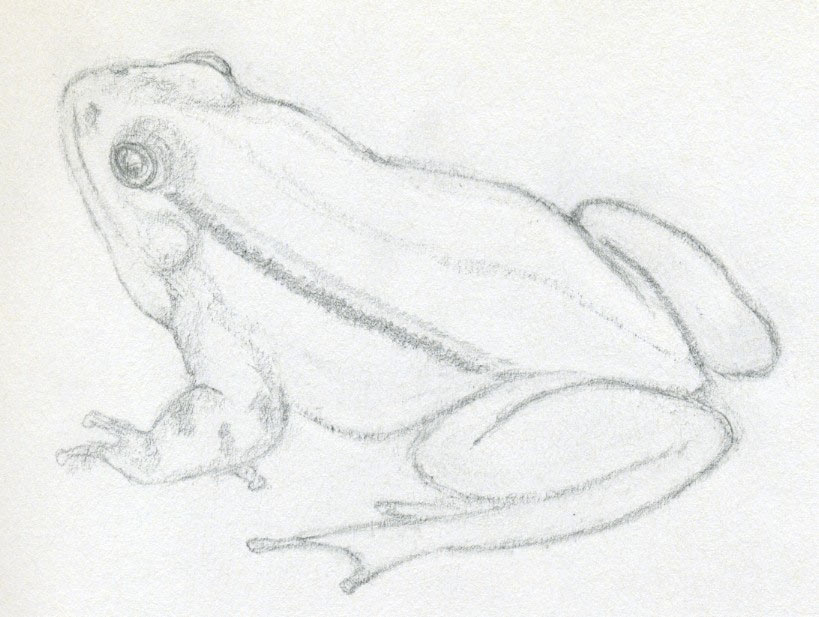
click the image to enlarge
Now is the time to gradually erase the unnecessary pencil lines around the entire body. While doing this work, always keep observing the original drawing – object, so that you will capture the most accurate curves of the body and the legs. They will just appear in correct proportions. This part should be called “how to erase a frog” instead of “how to draw a frog”, because now you are working mainly with eraser.
When you have erased all the excess - junk pencil lines, your picture should look similar to this or better. We can say that your frog drawing is almost ready.
click the image to enlarge
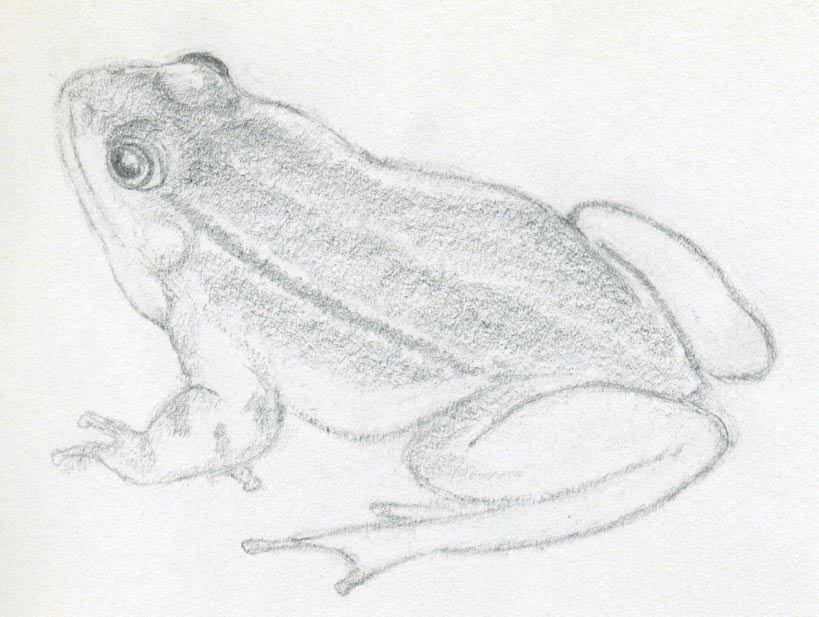
Put some shade on the frog’s back. Again, observe the original drawing – object and choose the right tone. Sharpen up the eye contours a bit.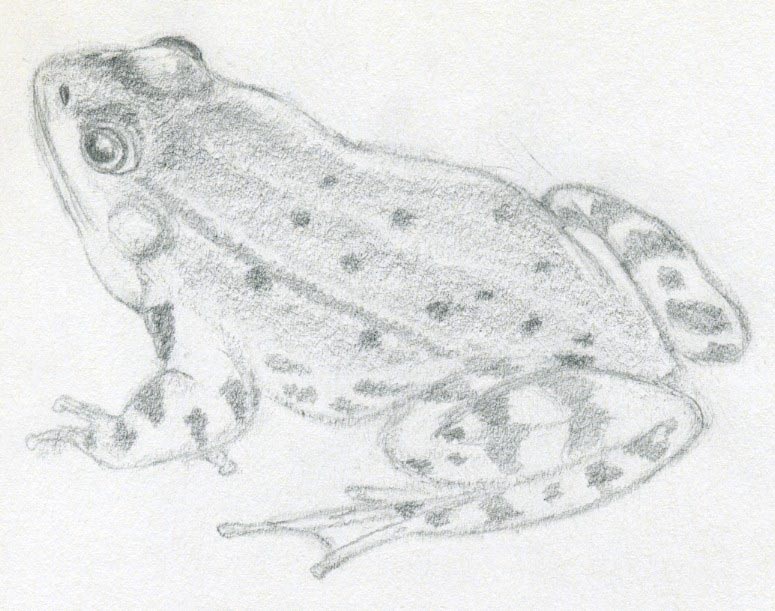
click the image to enlarge
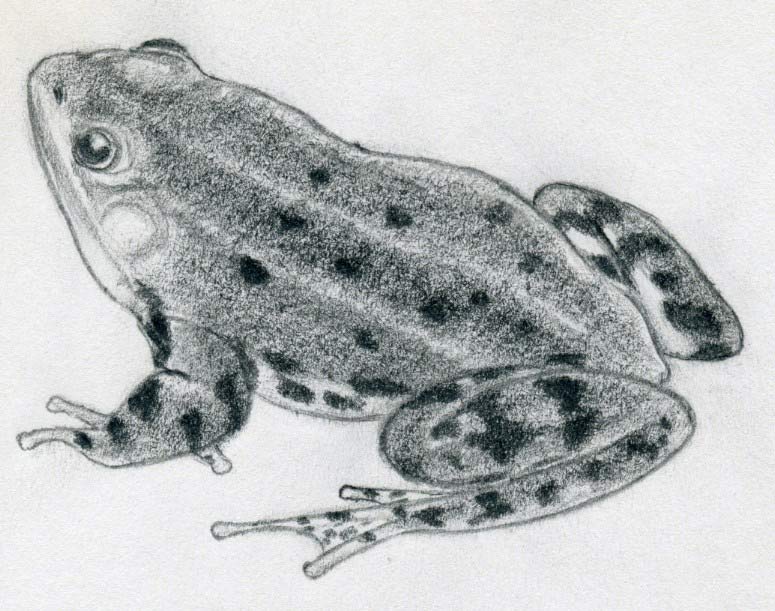
Highlight the dark pigmentation spots on the legs and the trunk of the frog. Mark out the nostrils and the tympanum - the round circle diagonally under the eyes. That is the frog’s ear. Yes, frogs have ears so they can hear each other as we do. Size might differ according to the species; keep that in mind when you draw a frog.Also draw the details of the webbed foot. The webs are especially visible on hind legs.
click the image to enlarge
Put darker tone on the body of the frog so that it looks more realistic. Darken the pigmentation spots on the body proportionately to the color tone of the body. Notice that bottom of the frog’s foot is of lighter tone, here it appears as white. This is visible a little on the part of the (far) right hind leg, on the belly and under the mouth.So, at this point you should have a ready, complete frog drawing and, know how to draw a frog. Make your drawing better than this one!
If you really made it till here, I would recommend you to search for a frog on google images (chose large ones) and sketch and draw one directly from the monitor of your computer.
