


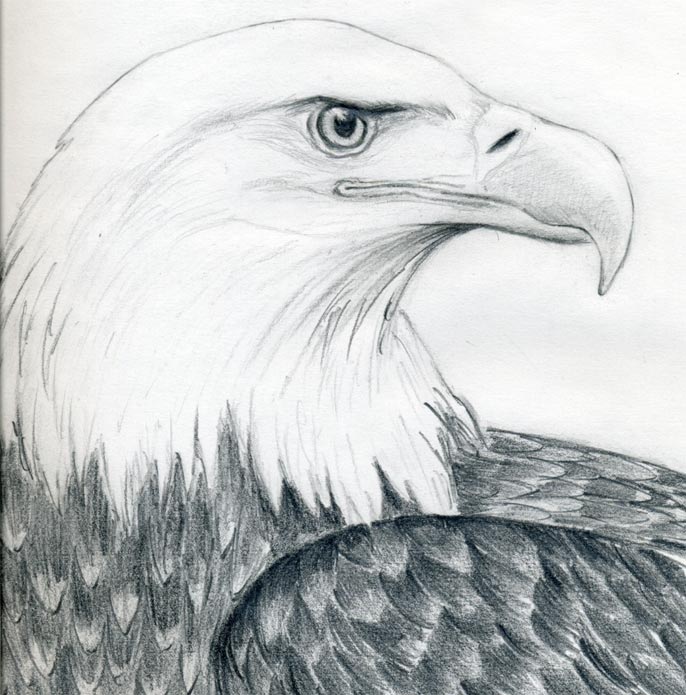
It is a fantastic experience to see this bird out in wilderness.
The population of this beautiful bird was fortunately restored and bald eagle was delisted from endangered species in 2007.
Today, I would like to show you, how to quickly draw a bald eagle in few simple steps.
The entire shape of this bald eagle is quite simple.
However, there are 2 or 3 points where we should be very careful in order to capture the bird’s expression.

I would like to point your concentration to the eyes, eyebrow area and the beak.
Put it simply: if you capture these 3 points as exactly as possible, any of your bald eagle drawings will be just or nearly perfect.

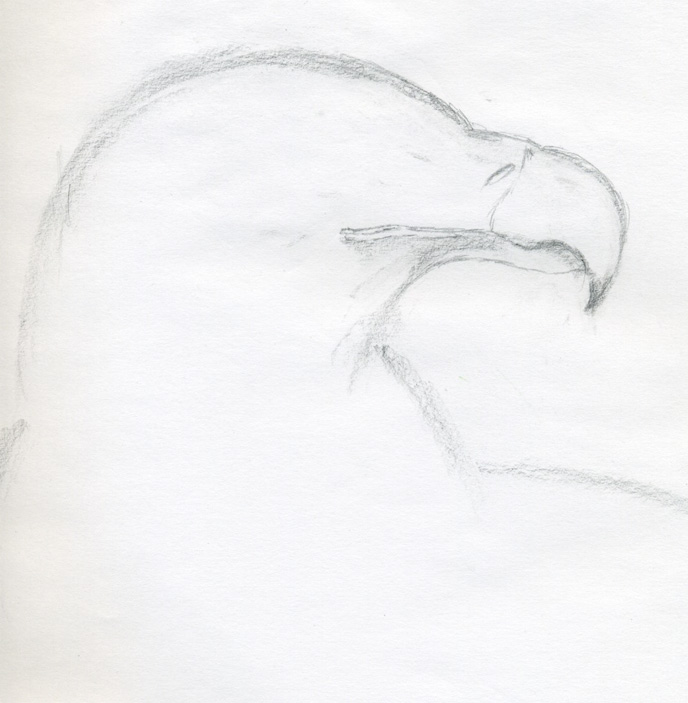
Just draw as many weak pencil lines as you feel necessary over each other, it is OK.
When you have a silhouette ready, erase excess lines until you get an outline, a profile that resembles most to the original (photo, drawing, etc).
Be careful in the proportional balance (size) between the head and the beak. Maybe it is good idea to do it first by using tracing paper, just to capture the contours.

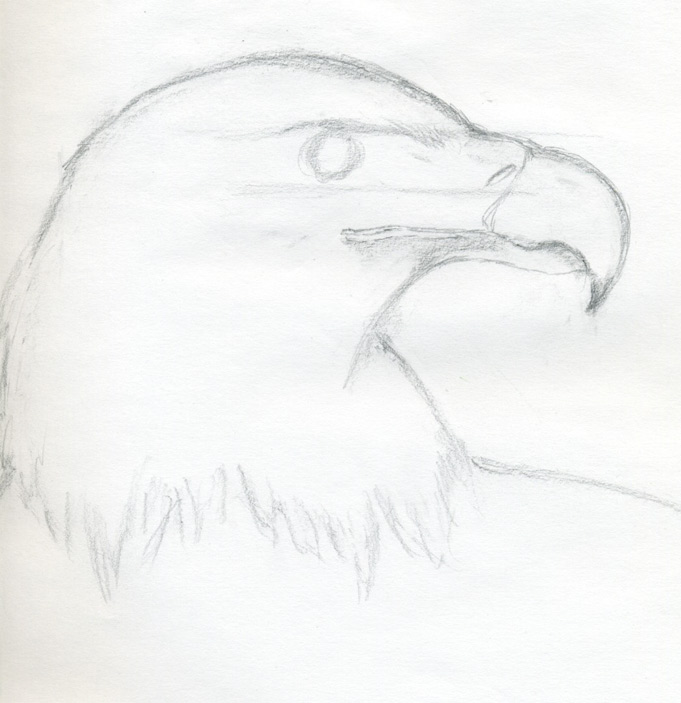
I made two weak pencil guidelines in order to capture the correct eye position.

Slightly lowered eyebrow part makes the expression of bald eagle look severe or strict. This strict face expression is exactly the point you should get.
So take your time and if necessary practice this one part on a separate paper until you get it, otherwise you will probably not be satisfied with your bald eagle drawing.
Under the lowered part of eyebrow is a shade. That shade extends to the eye. These small details are important!

I think now is the good time to finalize the exact shape of the beak too, so that you will have an almost ready drawing.
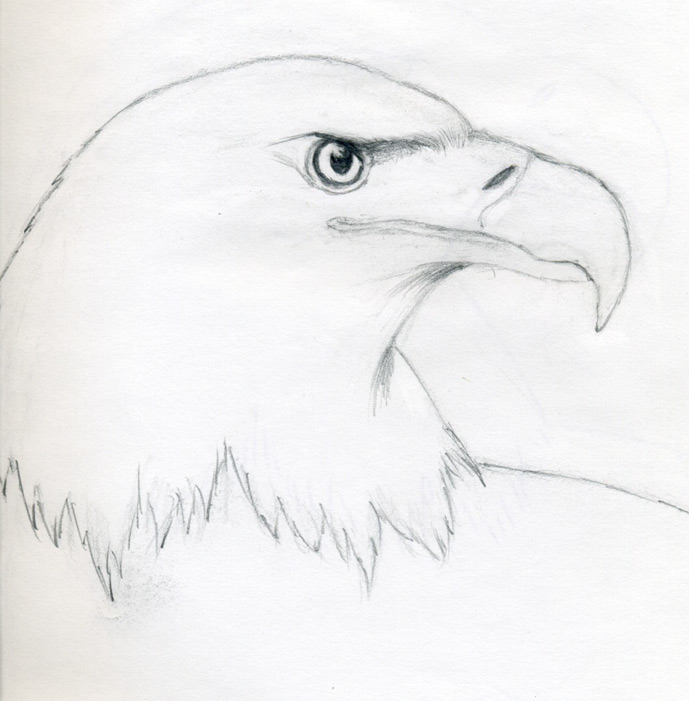
The rest of the body (in this example) is not so important. I would say if you can make it till here, then you learned how to draw a bald eagle. The rest is just scribbling…

The head of the eagle is white so I did not draw many lines on it, only the minimum to show the shades under the beak and around the eye area.
Body of bald eagle is dark brown so here we use a softer pencil 2B or 4B.
On the wing I drew weak guidelines of direction of the feathers. I did not put much importance on the exactness of feathers, so you can work them out better I believe.
Drawing birds generally requires also studying about the feathers a bit. We shall master these together and you will be ready to teach your friends how to draw a bald eagle.


Do not forget to shade the beak, but very carefully. The shade on the beak should be as weak as possible but visible.
The population of this beautiful bird was fortunately restored and bald eagle was delisted from endangered species in 2007.
Today, I would like to show you, how to quickly draw a bald eagle in few simple steps.
The entire shape of this bald eagle is quite simple.
However, there are 2 or 3 points where we should be very careful in order to capture the bird’s expression.
click the image to enlarge
As every human, every animal has face. Birds have face too, including bald eagle.I would like to point your concentration to the eyes, eyebrow area and the beak.
Put it simply: if you capture these 3 points as exactly as possible, any of your bald eagle drawings will be just or nearly perfect.
click the image to enlarge
By tilted pencil draw an outline contours of the body first. An approximate shape is perfect enough at this stage.Just draw as many weak pencil lines as you feel necessary over each other, it is OK.
When you have a silhouette ready, erase excess lines until you get an outline, a profile that resembles most to the original (photo, drawing, etc).
Be careful in the proportional balance (size) between the head and the beak. Maybe it is good idea to do it first by using tracing paper, just to capture the contours.
click the image to enlarge
Now comes the position of the eye. Pay special attention to this point. Among eye, eyebrow area and the beak, the eye is the most important to get it right.I made two weak pencil guidelines in order to capture the correct eye position.

click the image to enlarge
When you have the eye position just right, now you can draw a contour of the eyebrow.Slightly lowered eyebrow part makes the expression of bald eagle look severe or strict. This strict face expression is exactly the point you should get.
So take your time and if necessary practice this one part on a separate paper until you get it, otherwise you will probably not be satisfied with your bald eagle drawing.
Under the lowered part of eyebrow is a shade. That shade extends to the eye. These small details are important!
click the image to enlarge
The moment of truth: draw the eye. Notice the direction where the bird’s eye is watching and reflection of the light on the pupil of the eye.I think now is the good time to finalize the exact shape of the beak too, so that you will have an almost ready drawing.
The rest of the body (in this example) is not so important. I would say if you can make it till here, then you learned how to draw a bald eagle. The rest is just scribbling…
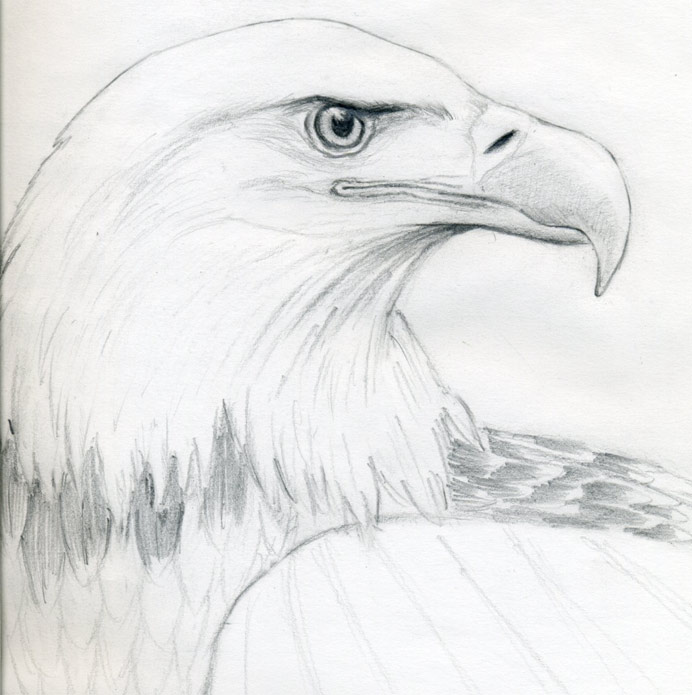
click the image to enlarge
Draw an outline of upper part of the wing. It is a simple ellipse shaped curve – a good exercise. The head of the eagle is white so I did not draw many lines on it, only the minimum to show the shades under the beak and around the eye area.
Body of bald eagle is dark brown so here we use a softer pencil 2B or 4B.
On the wing I drew weak guidelines of direction of the feathers. I did not put much importance on the exactness of feathers, so you can work them out better I believe.
Drawing birds generally requires also studying about the feathers a bit. We shall master these together and you will be ready to teach your friends how to draw a bald eagle.

click the image to enlarge
Tip of the feathers are of slightly lighter color – shade. You can draw feathers by simple pencil strokes as you see on the picture, but please make your feathers drawing better, OK! click the image to enlarge
Make some final adjustments, put some more shade here and there or erase excess lines.Do not forget to shade the beak, but very carefully. The shade on the beak should be as weak as possible but visible.
